
Defining a Song’s Tempo and Meter
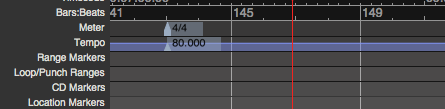
Mixbus allows simple creation and editing of a musical time/tempo map for each session. The meter and tempo map is controlled with the Meter and Tempo rulers. To show these rulers, right-click in the ruler area underneath the transport buttons and check the boxes for the Meter and Tempo rulers. Alternatively, you can use the View menu to hide/show the rulers.
Here are some reasons that you might want to set the Meter/Tempo for your song:
- To record with a “click” or metronome to help maintain consistent time among different performers and parts.
- To use the Grid to facilitate editing (if the audio follows the tempo map of the song).
- To add MIDI segments or loops, and have them follow the tempo changes.
By default, Mixbus starts with a single Tempo and Meter marker, set to 120 bpm and 4/4, respectively. If the session has a fixed tempo (or doesn’t use tempo at all ), then it is not necessary to create additional markers; and clicking on the Tempo button will adjust the session’s initial tempo marker.
In other cases, you may want the tempo to change at different times during the session. In this case you will right-click on the existing markers and set the tempo to the desired tempo and time signature. Right-clicking in the Meter/Tempo rulers allow you to create new Meter or Tempo markers.
Tempo Controls
You can click on the “tempo” button underneath the clock, and this will launch the Tempo dialog:

The tempo dialog provides these options:
- Tap Tempo: click this button repeatedly to set a tempo
- Beats per Minute: type a new tempo here, or use the +/- buttons to increment the tempo
- Tempo Starts at: this indicates the measure/beat where the tempo change occurs; edit these fields if needed.
- Tempo Type: tempo markers can be Ramped or Constant. Learn more about tempo ramps here: Tempo Maps
- Lock Style: learn more about music-locked tempo markers here: Audio Time vs Music Time (NOTE: the initial tempo marker is always locked to music time, so this option does not appear)
Time Signature (Meter) Controls
You can click on the “TS” (Time Signature) button underneath the clock, and this will launch the Meter dialog:
The tempo dialog provides these options:
- Beats Per Bar: the numerator of the time signature
- Note Value: the denominator of the time signature
- Meter Starts at Bar: this indicates the measure where the meter change occurs; edit these fields if needed.
- Lock Style: learn more about music-locked meter markers here: Audio Time vs Music Time (NOTE: the initial tempo marker is always locked to music time, so this option does not appear)
Using the Metronome (click)
To play a click sound during playback and recording, enable the “Metronome” button near the top-right of the edit window:

The rate of the click is defined by the session’s Tempo and Meter rulers.
You can visit Preferences->Metronome to edit the click’s sound; or just right-click on the metronome button to immediately view the properties.
Using the Grid
Editing with the “Grid” allows you to make edits perfectly aligned with other events. If the grid is set to musical time (and the audio was recorded to a click) then editing can be done very quickly without zooming in, because you know all edits will happen on a musically-sensible time.
To learn more about Snap + Grid settings, visit Snap and Grid
Post your comment on this topic.