
The basic operation of the grid is accomplished by launching (playing) the audio or midi clips inside the grid.
To play a clip, you must first load an audio or midi file into the slot. This can be accomplished by dragging from the Clip Picker window.
Playing a Clip
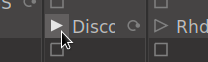
Once a file is loaded into a slot, you can click on the ‘Play” triangle on the left side of the slot to play that clip:
Some notes about clip playback:
- Only one clip can be playing, at a time, on a track.
- A clip doesn’t start playing until its quantization boundary occurs. For example, the default setting is for a clip to wait until a measure boundary. This allows your clips to play in sync with each other, even if you don’t click the Play buttons at exactly the same time.
- whenever you launch a clip, you’ll notice that the main session transport plays as well. This is necessary because the clip needs to know the timeline position (for quantized launching) and tempo (for stretching).
If you click a second clip’s Play button while the first clip is still playing, then the prior clip will continue playing until the new clip’s quantization boundary occurs. Then the new clip will take over playback and the prior clip will stop.
Clip Progress Indicator
When a Clip is playing in a Track’s trigger-grid, an indication is shown for the playback progress of the current clip:
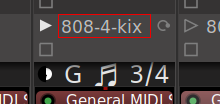
The ‘pie chart’ on the left side shows the percentage of the clip that has been played.
The “G” indicates the row of the currently-playing clip.
The “3/4” indicates that this clip has been assigned a ‘Follow Count’ of 4, and it has already looped 3 times.
Stopping a Clip
There are several methods to stop a clip, depending on what you want to accomplish:
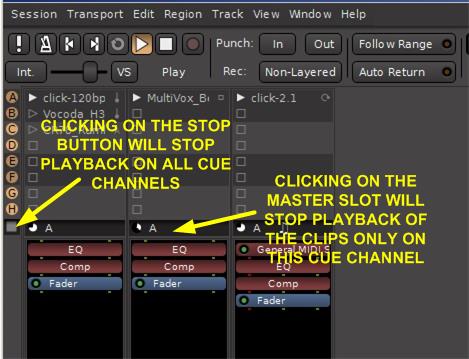
- Click on any empty Slot in the same track. That will stop the playback of the current clip in this track (column), at the end of this measure.
- If there is no easily available empty Slot, you can click the “trigger master” at the bottom of the grid. That will stop the current clip in this track, at the end of this measure.
- To stop “all” playing Clips at once, click the stop button in the Cues column (far left column). That will stop ALL playing Clips, at the end of this measure.
- Press the master transport Stop button. That will immediately stop all playing Clips.
Follow Options
When a clip reaches the end of its length, the clip’s “Follow Option” is triggered. This might cause the clip to play again, to advance to the next clip, or to stop, among other options. see Aranging with Follow Options
Post your comment on this topic.