
What is a Playlist?
A track has a series of Regions on a timeline. Each Region represents a part of a sound file (or MIDI file). The order of these regions, and additional region properties such as gain/controller curves, fades, and mute/unmute status, are stored in the track’s playlist.
Think of a playlist as a separate piece of tape, or a 3rd dimension (into the screen) with different versions of your track or section of a track.
Tracks can have multiple playlists, but only one can be selected at a time. The selected playlist is the only one you can see and hear. But you can quickly select any alternative playlist, or create a new one (or copy the current one) anytime.
Some users like to use playlists to manage the recording “takes” in a tracking session. See: Recording Takes with Playlists
Accessing a Track’s Playlist functions:
Clicking the “P” button on a track header opens the Playlist menu:
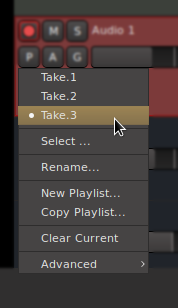
At the top of the menu, you’ll see the available playlists for this channel. Selecting a playlist will change the playlist (for this channel and its group members). This is convenient for the simplest cases where you have a single track, or a track Group, with a few takes or edits that you need to select between.
The remaining items are:
- Select : this launches an advanced dialog that allows you to create and manage playlists, potentially for multiple tracks at once. Learn more here: Playlist Selector dialog
- Rename… : you will be prompted to rename the playlist. NOTE: all other playlists with the same pgroup will be renamed to match
- New Playlist… : this creates a new empty Playlist. You will be prompted for a name of the new playlist. This only applies to the selected track or group
- Copy Playlist… : this creates a new Playlist, with the same information as the current playlist. You will be prompted for a name of the new copy. This only applies to the selected track or group
- Clear : this deletes all the regions and their edits on this playlist. the playlist itself remains, now empty.
- Advanced… (see below)
Advanced menu
The Advanced heading provides 3 additional power-user features. These features allow you to select a playlist from some other track in the session.
- Copy From… : creates a copy of any playlist (on this or another track).
- Share with … : this allows the track to use the same playlist as the source track. Any edits on the playlist from either track will be seen on both tracks.
- Steal from … : same as “Share with”, except the playlist is now ‘owned’ by this track. It won’t show up in the P menu of the original track
The ‘copy’ option is useful when you duplicated a track, for example, but you forgot to copy the playlist during the Duplicate operation.
The ‘share’ and ‘steal’ options can be used to create a parallel processing path: you can have 2 tracks with different plugins and processing; and any edits will be kept in perfect sync (since both tracks actually share the same playlist)
Comping Playlists
A “Comp” is a composite take that is assembled from the best parts of several original takes.
Mixbus does not have a dedicated ‘swipe-to-comp’ function. We allow overlapped layers, and we allow multiple ‘comp’ playlists, and we allow you to ‘punch-in’ anytime, like a tape machine. Other DAW’s swipe-to-comp does not allow for those real-world complexities. You’ll quickly see the benefit of using the full features of Mixbus’s editor when you want to make a comped take (or multiple comps!)
To ‘comp’ a take on a single track, you might follow these steps:
1) prepare for editing by choosing the Range tool, setting your edit point to Playhead, and enabling “Follow Range” so the playhead will always follow your mouse’s Range selection
2) prepare to switch layers by opening the “Playlist Selector” dialog on the track
3) select your best overall take, click ‘Copy Playlist’ and name it ‘comp’. This is the playlist that will hold your final result.
4) use the Range tool to select a phrase in the comp take, and press spacebar to audition it
5) use the Playlist selector to switch to the alternate playlists, and decide which one is the best phrase
6) when you’ve found the best phrase, copy it (Ctrl+C or Cmd+C on mac)
7) switch to the comp playlist, and paste the phrase (if you already have some material there, you might Delete first, unless you want the extra layers)
8) select the next phrase, and repeat steps 5,6,7 until you’ve comped the full length of the track
Multi-track comps work the same way: Assuming the playlists share a pgroup, then you only need to open a single track’s “Playlist Selector” and check the box for “rec-armed tracks” or “ALL tracks”. You’ll also want to SELECT the desired tracks that you want to edit (typically the rec-armed tracks, to match the selector, but not necessarily). Your Range selections, copies, deletes, and pastes will be applied to all selected tracks.
Using Playlists as a ‘backup’
A ‘snapshot’ stores the entire session state: editor and mixer.
But sometimes it is convenient to return to a prior arrangement (including all the edits, fades, and region-gain adjustments) without reverting your mixer and plugin settings.
You can use playlists for this purpose. Try making a ‘Copy Playlists for ALL Tracks’ and name it something special, so you can return to. Then do another ‘Copy Playlists for ALL Tracks’ to create a working copy while leaving the backup copies intact and named appropriately. By creating the Copy on all tracks at the same time, you can now switch between the copies and the other tracks will follow.
Post your comment on this topic.