
Automation
‘Automation’ is used to change the settings of a knob (or other control) as the playhead advances on the timeline. For example you might want to increase the volume of a delay effect during the “chorus” part of a song, or automate the master fader to make a smooth fade-out at the end of a track.
Many mixer parameters may be automated: fader, mute, pan, mix bus sends, eq, compressor, and plug-in settings.
The short video below demonstrates how to open an automation lane:
Alternatively, you may enable the menu item “Edit->Show Automation Lane On Touch” in the main menu. In this case, any time you touch any automatable parameter (including those in plugins), it will automatically open its associated “automation lane” in the Edit window so that you can set or modify it. If you ‘draw’ automation into the lane, then it will stay exposed. If you don’t write any automation then the lane will be automatically hidden when you touch a new knob. This feature streamlines your display down to just the automation parameters you are adjusting when you have a lot of tracks, a lot of plugins and a lot of automated things.
This short video gives some examples of using this feature:
Real-time (“Touch”) Automation:
In Real-time automation the parameter is put into a “record” mode. While the transport is rolling, the user moves a knob, and these moves are recorded.
In the Mixer window below every fader, there is an automation button dedicated to that fader because this is a very commonly-automated control (circled in red, below).
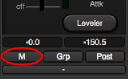 ( this button only affects the automation mode of the fader )
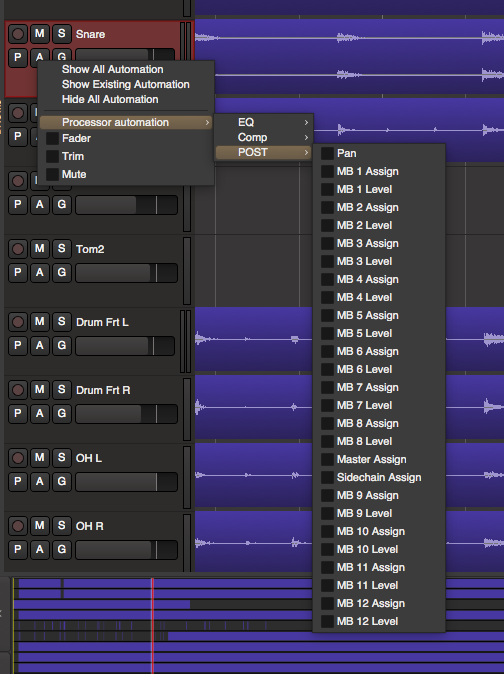
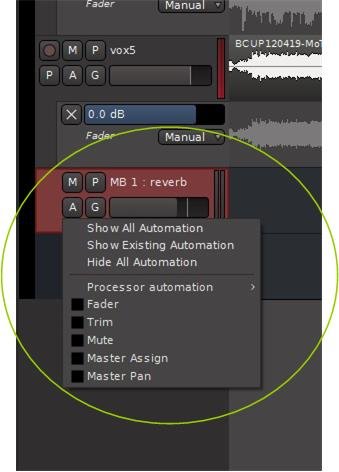
Additional parameter automation can be accessed from the the track’s header: click the “A” button to view fader and mute automation. Under “Processor Automation” are EQ parameters, Compressor parameters, and plugin parameters. You’ll find the Pan and bus sends under “POST”.
Here is a description of the modes:
| Manual | Automation is ignored. |
|---|---|
| Play | Whenever you locate, the parameter will jump to the value that is recorded in the automation. You cannot change the value manually. |
| Write | When locating, the value will stay as it is (no playback of automation). During playback (only), the current value will be written to automation. You can move the control manually and your move will be written to the automation. |
| Touch | The parameter will act like it is in Play, unless you “touch” it with the mouse (or a control surface that is touch-sensitive). Then it will record your moves until you release the mouse button, at which point it will revert back to the saved value at that time point. |
| Latch | Operates like “Touch” mode except it will retain the last value of your moves when you release the mouse button. |
The mouse wheel has a slightly different automation mechanism. It works in “Latch” mode even if a different automation mode is selected. When the wheel is turned, it “touches” the parameter and begins recording the move. The automation continues to record until the transport stops.
Automation Thinning:
When automation is recorded in real time, the automation data points are “thinned” so that only enough control-points are created to adequately capture the moves. The points will appear very sparse if the control is moving slowly, and will be created very close together during fast moves. The aggressiveness of thinning can be adjusted if necessary via menu Edit>Preferences>Misc.
Punching in your automation with “Touch” mode:
When you punch-in, 2 points are created: one to hold the previous value, and one to start the new changes. Similarly, when you release the control (or stop a pass in Write mode) then 2 points are also created: one which ends the new changes, and one to hold the previously-existing value.
Graphical Automation Editing: Automation tracks
You hide and show automation lines using the “A” button on the track header, or right-click on the track header and select the parameter for automation.
Automation appears in a separate track from the audio. Multiple automation tracks may be shown simultaneously. If the automation track is associated with an audio track, a “ghost” of the region’s audio will appear in the track. Buses do not show waveforms in the automation tracks.
Automation may be graphically edited using either the Draw, Grabber or the Edit (Contents) tool. The rules for each are slightly different (and may change in the future)
Grabber tool
- Click a control point to grab it and move it
- Click a line to move the gain points on either side of the line.
- Right-click on a control point to Edit or Delete it.
Range Tool
- Drag a Range, then you can:
- Click Delete (or Backspace) to delete the automation in that range ( with guard points that prevent you from adjusting data outside your range selection )
- Switch to the Draw tool, and drag up/down to move all the points in that range ( with guard points )
- To view a demonstration, see this video clip: Region Gain editing with the Range tool. … this technique also works with automation lanes.
Draw tool
- Click anywhere in the track to create a new control point, and connect it to the points on either side.
- Click a control point to grab it and move it. ( now it is selected so you can delete it )
- Click a line to move the gain points on either side of the line.
- Right-click on a control point to Edit or Delete it.
Edit Tool
- Click a control point to grab it and move it.
- Shift+right-click a control point to delete it.
- Click anywhere in the track to start a “box select”, then:
- Click Delete ( or Backspace ) to delete the selected points
- Grab one control point, and move them all together
- Right-click on a control point to Edit or Delete it.
Clicking with the Draw tool will create the first control point, and also draw a line to the very beginning of the track.
- Click anywhere in the track to create a new control point, and connect it to the points on either side.
- Click a control point to grab it and move it.
- Click a line to move the gain points on either side of the line.
- Use the Range tool (or Object+Smart mode) to create a “range”. Now switch to the Draw tool, click inside the range, and you can drag the entire range up/down.
Clearing Automation
To clear saved automation in an individual Automation lane, right click on the automation lane (NOT the audio track) header and select “clear”. All of the automation saved in that lane will be cleared.
Note that if you are automating multiple controls on a particular track, each automated control will have their own automation lane. So for example you could clear and re-do your fader moves without affecting the other automation controls on the track.
![]()
Automating Mix Buses
Normally the mixbuses are not shown at the left of the screen with the track headers. This is because mixbuses do not store audio. While automation of the mixbus fader can be selected on the mixbus strip in the Mixer panel, it is sometimes necessary to automate other functions on the mixbus.
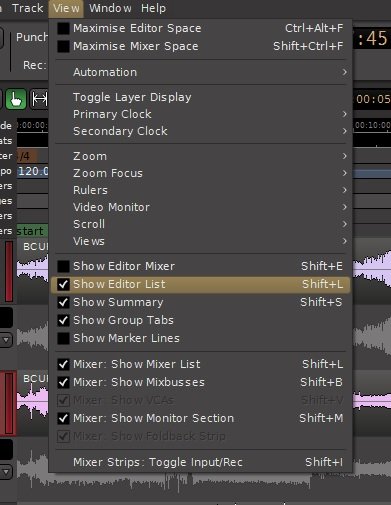
To display a mixbus at the left along with the track headers so that its parameters may be automated, first open the “Editor List”:
In the Editor List make the desired mix bus(es) visible by checking the “V” box:
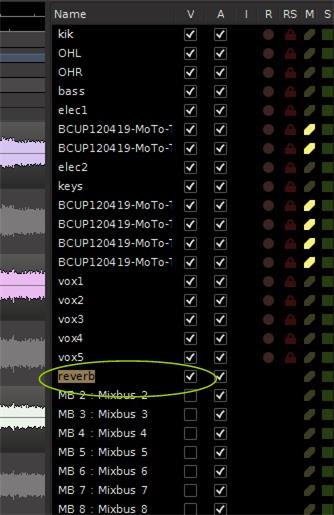
The mixbus header will now be displayed at the left along with the other track headers. Clicking on the “A” automation button allows you to set up any parameter on the mixbus to be automated.
Post your comment on this topic.