
Importing via Drag&Drop
Audio & MIDI Files may be imported to Mixbus by dragging and dropping them from a file browser into the editor window. The file will be imported to the track where it is dragged; if you want to create a new track for the file, then drag the file to the empty area at the bottom of the editor canvas.
Importing Audio files with the Import dialog
Using the import window (Session->Import) is a much more flexible and powerful way to import files to Mixbus.
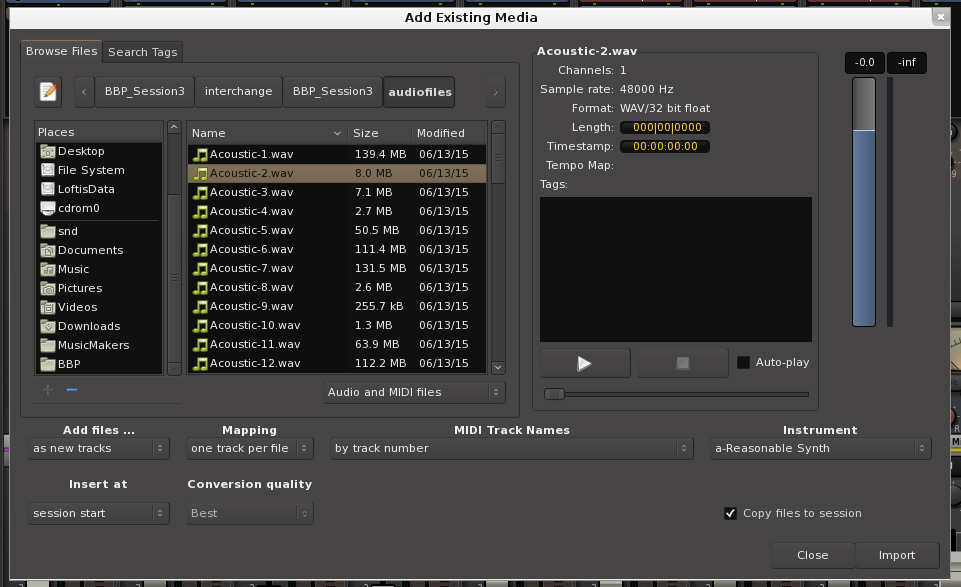
The Import dialog allows you to add existing media and has 2 tabs at the top: “Browse Files”, and “Search Tags”.
- The Path Bar: Shows your current path and allows you to navigate back “up” the directory tree.
- The Location Bar: Allows you to directly type in the name of a file in this directory or enter the entire path via text (the “notebook” button shows or hides the Location bar).
- Places: A list of common locations on your computer. The top two items, “Search” and “Recently Used”, are always there. Clicking “Search” allows a text entry to search your system. Warning: This can take a LONG time. The lower section provides shortcuts to commonly-used locations. You can Add and Remove these locations using the buttons underneath. You can also remove or rename locations by right-clicking on them.
The main area shows a list of files in the current directory. They can be sorted by Name, Size, or Modified Date by clicking on the headers at the top of the columns. Underneath is a selector to show “Audio Files, MIDI Files, Audio and MIDI Files” (files with recognized audio file extensions such as .wav), or it can show “All Files”.
To the right of the file selector is the Sound File Information area. When a file is selected in the browser, you get a report of the number of channels, sample rate, and in the case of broadcast wave files, the timestamp when it was recorded. There is also an area to enter metadata “tags” for the audio files. Tagging files this way makes it very easy to find them in the future, using the “Search Tags” tab. If a MIDI file is selected you get a report of number of channels, Format, Length, and Timestamp.
Finally, there are options to Audition the files. You can click “Play” to play the file, Stop to stop playing, or choose auto-play so that files automatically start playing when you click on them. By default files will play when you double-click on them. There is also a level-fader on the right side that allows you to trim the audition level.
Add Files …:
- As New Tracks: Each file will be imported to a new track.
- To Region List: The imported files will be imported to the region list but no tracks will be created. This is useful if you are importing individual hits or effects into the region list, where you will use them to replace existing sounds.
Insert at:
- Use File Timestamp: After importing the file will be located at the file’s time stamp (if it is a bwav file).
- At Edit Point: After importing the file will be located at the edit point.
- At Playhead: After importing the file will be located at the playhead location.
- At Session Start: After importing the file will be located at the session’s start marker.
Mapping:
- One Track Per File: Each file will be appear on one track. If the file is stereo, it will be a stereo track. If there are more than 2 channels then they will be ignored.
- One Track Per Channel: Each channel of each file will appear as a track. If a file is stereo, it will be converted to 2 mono tracks. An 8-channel wav file will be converted to 8 mono tracks.
- Sequence Files: If this option is selected, then the files will be imported to a track, and will be imported sequentially on the timeline.
- Merge Files: This option ONLY appears when 2 files of identical length are selected. “Merge files” will load the 2 mono files as a stereo file.
MIDI Track Names:
- By track number : this will use the MIDI file’s track numbers, as the name for the newly-created track(s)
- By Track Name : this will used the MIDI file’s embedded “track name” information to name the newly-created track(s)
- By Instrument name : this will used the MIDI file’s embedded “instrument” information to name the newly-created track(s)
Conversion quality:
If the file has a different sample rate than the current session, it is necessary to do sample rate conversion. This determines the quality and it is always recommended that “Best” is used.
Instrument:
If MIDI data files are imported this option will install a basic synth plugin on those tracks called “ReasonableSynth”. This built-in utility allows you to audition your MIDI performances without any plug-in parameters to set incorrectly. It may be deselected and substituted with another plugin via the drop down list or after the track has been added to the session.
Use MIDI Tempo Map:
If enabled, Mixbus will import the MIDI Tempo markers from the first selected MIDI file, and apply it to the session’s tempo map.
Copy Files to session:
Tags:
If you have used the Tag feature to “tag” files that are used in the past, then you can use the Search Tags tab to find those files quickly. In this case, we searched for the term “shout” which was added to the files on the previous page. They instantly appear in the file area to be auditioned and imported.
Post your comment on this topic.