
What is Aligning?
Aligning regions means moving one or more regions based on the edit point. An alignment operation moves the region(s) so that some part of the region is positioned at the edit point.
For example, you can select 10 regions in the timeline, and select “Align Regions”. (typically these regions will be on different tracks, but that’s not necessarily so) . The regions will be moved so they all start at the same time on the timeline.
Available alignment commands include:
- Align Region starts
Selected region(s) are moved so that their start is located at the current edit point - Align Region ends
Selected region(s) are moved so that the end is located at the current edit point - Align Region sync points
Selected region(s) are moved so that their sync point is located at the current edit point - Align Region starts relative
Selected region(s) are moved so that the start of the earliest region is located at the current edit point, and all others maintain their relative position relative to that region
What is the region’s “Sync Point” ?
By default, a region’s “sync point” is the start of the region.
However, consider the case where here is some blank space at the start of a region which should not be trimmed away, but causes the region to align incorrectly with other regions. For example, imagine the case where a drum hit is not at the immediate edge of the region’s start, but slightly delayed after it. If you “snap” the region to the grid, you’d like the drum hit to land perfectly on the grid, not slightly off.
By defining a region’s “sync point”, you can align and snap regions with each other sensibly, while freely trimming the starts of the regions for crossfades and such.
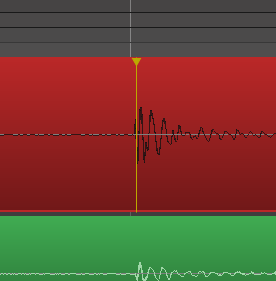
Sync Point:
By default, a region’s leading edge will snap to the grid but often this edge is not relevant to musical timing. By setting a sync point within a region (ex: on the downbeat) the region can be snapped to the grid in a musically meaningful way.
To set a sync point:
Select the region and place the cursor where you would like the sync point. Press the “v” key and a yellow line will appear. Now the region can be snapped to the grid using the sync point as the reference.
To move a sync point:
Simply repeat the procedure above (there can be only one sync point per region).
To remove a sync point:
Select the track with sync point then choose: Menu>Region>Position>Remove sync. (This effectively sets the sync point back to the beginning of the region)
Post your comment on this topic.