
Input
Mixbus uses an internal audio routing system to make audio connections between Mixbus, your sound I/O, and other parts of Mixbus.
With a new session, Mixbus makes these connections:
- The master bus is connected to the first two physical output ports.
- Track/Bus inputs are assigned sequentially from the physical inputs whenever a new track/bus is created.
- The Auditioner and the Click are connected to the first two physical output ports.
However it is possible to change any or all of these connections using buttons in the mixer strip, or Window->Audio Connections.
Track I/O Selections
Track inputs can also be assigned directly from the channel strip, by clicking on the switcher near the top of the channel strip to reveal the channel’s redirect page. See it’s individual page for more details.

The image above shows a channel strip before its switcher has been activated

The same channel strips after its switch has been activated showing its redirect page.

An animation showing how to change the inputs of a channel
Output
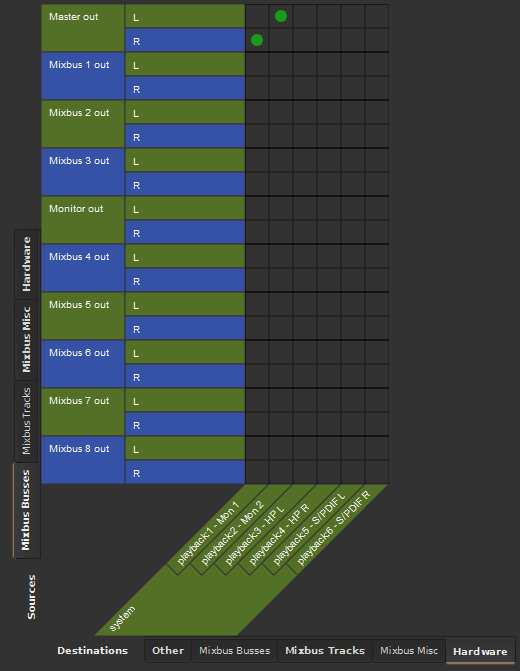
For convenience, the Master Bus has an “output” button on its redirect page, which can be used to select the ports that the master bus output will feed. Normally, you connect the Master Bus output to your audio interface outputs.

In the above image the master bus has both of its outputs connected to the audio interface 1/2 stereo output.
Audio Connections Manager
The Audio Connections Manager window allows you to connect any output port to the track/bus input:
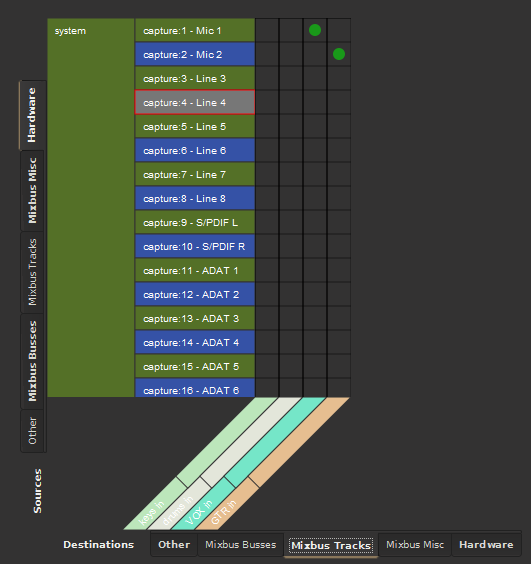
In the above image an audio interface with 16 inputs is shown (viewed via the hardware tab on the left side). The bottom tab labeled “Mixbus Tracks” shows a total of 4 tracks in the session. The green dots indicate Mic1 is connected to the Mixbus channel strip input labeled VOX and Mic 2 is connected to the Mixbus channel strip input labeled GTR. The other two channels labeled keys and drums have no connections because in this example those tracks had been recorded previously. This is an example of having drums and keys already recorded and a vocalist and guitar player coming to the studio for an overdub session.
The image below shows the output of the Master bus. You can use the grid to connect the master bus to your speakers, and a stereo bounce track, and any other connections:
Post your comment on this topic.