
Audio MIDI Setup
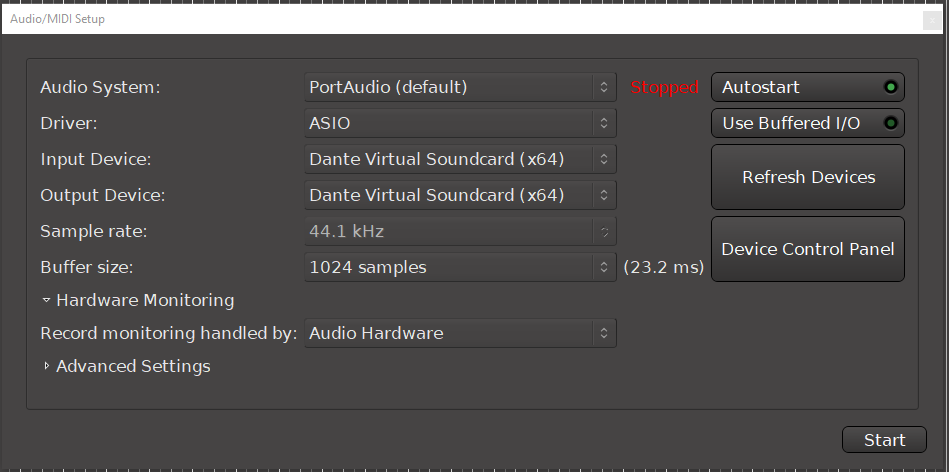
The Audio Midi Setup dialog appears automatically when you create a “New” session. This step allows you to choose the session’s sample rate, as well as the soundcard settings and other details.
You can also launch the Audio Midi Setup dialog from the main menu, under “Window”.
Start/Stop
As seen in the figure there is an indicator showing “STOPPED” in red while you are setting up these parameters. When you are done with the settings, press the “START” button to connect to the selected audio device.
Audio System:
The “Audio System” selection tells Mixbus which way you will connect to your devices.
- To use your audio devices on Mac OS X, select “Core Audio” (this option is only available on Mac).
- To use your audio devices on Windows, select “PortAudio” (this option is only available on Windows).
- To use your audio devices on Linux, select “ALSA” (these options are only available on Linux).
- “JACK” uses the JACK server to talk with your sound card and other software on your system. It is only available if you have already installed JACK on your system. If the JACK server is already running, then Mixbus will connect to the JACK server. If not, then Mixbus will start the JACK server for you (the JACK option is available on Mac, Windows and Linux). You can learn more about JACK here.
Driver (Windows-Only)
This menu specifies the driver software protocol for the selected input and output devices detected. the choices for Driver are:
- ASIO (preferred): Dedicated audio devices (usually connected with USB or similar) should be provided with an ASIO driver by their manufacturer. ASIO provides multiple channels of high quality sound, at low latency.
- MME: use MME for built-in devices or other soundcards that do not have an ASIO driver. MME devices are limited to 2 channels of input and output, and incur additional latency (delay) of the audio signal.
Input Device & Output Device:
- Select your preferred audio interface from the pulldown list. For best results, you should use Mixbus with a high-quality audio interface.
- Some combinations of input & output devices will not work. Normally, you should choose the same or similarly-named device for both input and output.
Sample rate:
- A drop down list with supported sample rates by your selected audio interface will be displayed with a maximum of 192k.
Buffer size:
In conjunction with sample rate, buffer size is used to control latency and to manage hardware resources. See more here.
Hardware monitoring:
- Mixbus does monitoring: when this is selected, Mixbus will sometimes (depending on settings) allow you to hear your input signal through the mixer. However, this incurs a latency (delay) caused by the soundcard buffering, plugins, operating system overhead, and other potential sources of delay.
- Hardware does monitoring: when this is selected, Mixbus expects you to monitor yourself through your soundcard’s audio device or built-in mixer. This avoids the latency caused by entering and leaving the computer’s operating system.
You can learn more about track monitoring, and the settings that drive it, here
Device Control Panel:
This opens the control panel of the audio interface that has been selected on the “Device” list, when one is provided.
Autostart
When enabled, Mixbus will skip the “Audio Setup” dialog, whenever possible (for example: when opening an existing session, and the last-selected audio device is capable of the session’s sample rate).
When creating a New session, the Audio Setup dialog will always appear so you can select a sample-rate for the session.
Refresh Devices
This re-scans your audio hardware to provide all the available devices in the Input/Output device menus.
Use Buffered I/O (Windows-only)
The “Buffered I/O” button tells Mixbus to use an older ASIO protocol which works better on some devices, including Roland “Capture” devices. If you have trouble launching the audio system, and/or you are unable to set the buffersize and sample rate, you might try enabling “Use Buffered I/O”
Advanced Settings
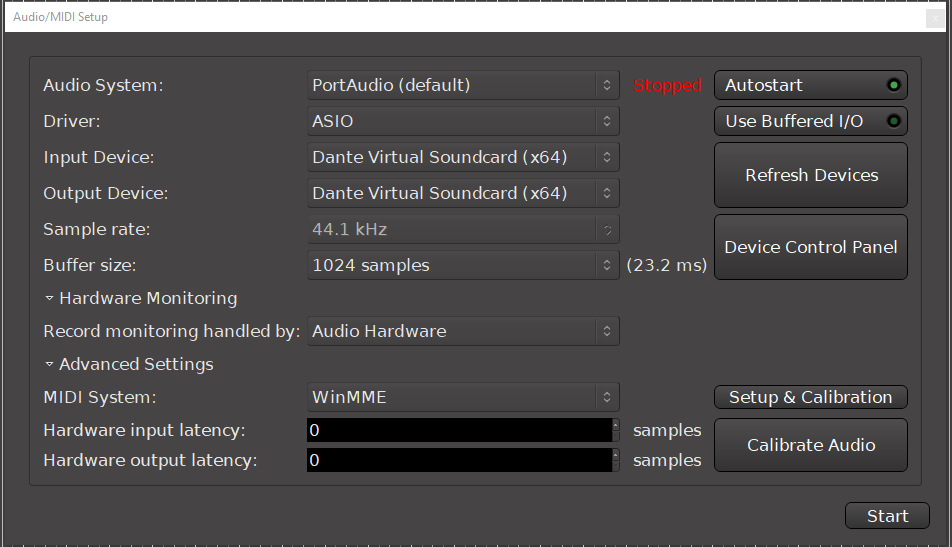
MIDI System
This selection will default to the MIDI framework supported by your OS. You can select “None” if you think the MIDI system is unneeded, or is delaying startup.
Setup & Calibration
This button will call up a dialog that lists your MIDI devices and allows you to assign a delay (latency) for the device. The latency will be accommodated by entering notes ‘earlier’ on the timeline, after they are recorded.
Hardware input * output latency:
When audio is routed from outboard equipment and back to Mixbus it must undergo a conversion from analog to digital (ADC), the time it takes for this conversion can be entered to compensate for latency so that all audio remains time aligned (This process can be automated, see “Calibrate Audio” below).
Calibrate Audio:
This calls up a latency measurement tool with step-by-step instructions to compensate latency introduced by external equipment and the digital to analog, and analog to digital conversion process.
Post your comment on this topic.