
Scrolling
The editor canvas may be scrolled up/down and left/right to display a different selection of tracks or time on the timeline.
Vertical Scrolling
- Mouse Wheel: The primary method of vertical scrolling is the mouse scroll wheel ( or the 2-finger drag, on a touchpad ).
- Keyboard: The up/down arrow keys will scroll the view vertically
- Selections:
- Alt+up/down arrow (Ctrl+arrow on a mac) will move the selection up & down, which will cause the editor to scroll to keep the selection in view.
- Selecting a track header will cause the track to be scrolled fully into view.
- Selecting a track name in the “editor list”, or the mixer window, will cause the selected track(s) to be scrolled into view.
- Dragging an object:
- Dragging a region to the top or bottom of the screen will cause the canvas view to be scrolled
- Using the Summary View: Scrolling can be accomplished by grabbing the gray box in the summary view window and dragging it, or by clicking the arrow buttons at the left and right sides of the window.
Horizontal Scrolling:
- The primary method of horizontal scrolling is to move the Playhead ( these operations require that “Follow Playhead” is engaged )
- Click and release in the ruler-bar area to locate the playhead there;
- Click & drag in the ruler-bar area to drag the playhead. When you approach the left or right edge, the screen will scroll to keep it in view.
- The editor canvas can be scrolled horizontally by locating in the Mini-Timeline.
- Various transport functions like “to start”, “to end”, or next/previous marker will move the playhead and therefore scroll the view.
- Keyboard Shortcut: the menu item View->Scroll Timeline can be assigned a keyboard shortcut to allow scrolling from the keyboard.
- Mouse Wheel: Hold “Shift” while turning the mouse wheel to scroll the timeline left/right.
- Mouse with side-scroll wheel ( or Touchpads with a 2-finger side-to-side drag. )
- Dragging an object:
- When you try to drag a region, MIDI note, or automation control point off the left or right edge of the canvas, the screen will scroll to keep it in view.
- Using the Summary View: Scrolling can be accomplished by grabbing the gray box in the summary view window and dragging it, or by clicking the arrow buttons at the left and right sides of the window.
Following the Playhead
In most cases, you’ll want the screen to automatically scroll sideways to keep the playhead in view. Mixbus has 2 settings in the Transport menu which control this feature:
- Follow Playhead: when this is enabled, the screen will scroll sideways to keep the playhead visible, each time the playhead leaves the one side of the screen, the screen will move to show it again.
- Stationary Playhead: when this is enabled, and Follow Playhead is enabled, the playhead will remain in the center of the screen, and the waveforms will scroll underneath it.
Sometimes, you might prefer to scroll to a location, and prevent the playhead from moving your view. For example you might zoom in very close to make an edit, and you want to remain looking in the same place while the playhead plays over a selection. In that case, you can disable “Follow Playhead”.
Zooming
“Zooming” adjusts the scale of the timeline to show a greater or lesser portion of the timeline.
- Mouse Wheel: zooming with the Mouse Wheel is the preferred method:
- Hold “Ctrl” ( “Cmd” on Mac) to zoom in or out on the mouse’s location
- Zooming with the Summary view
- Dragging up/down in the” summary view”:https://rsrc.harrisonconsoles.com/mixbus/mixbus-live-manual/8/en/topic/summary-view will zoom the session.
- Zooming with the ruler-bar (playhead)
- If the option “Preferences->Editor->zoom with vertical drag in rulers” is engaged, then dragging up/down in the ruler-bar will zoom around the playhead.
- Keyboard: + (plus) and – (minus) keys increase or decrease the zoom around the Zoom Focus. (see below)
- Zooming on a Range
- Select a Range with the range tool (or smart tool) and then click “z” to fill the screen with the selected range
- View>Zoom Menu items:
- Zoom to Session: Brings the entire sessions audio clips into view.
- Toggle Zoom State: Alternates between the last 2 zoom states
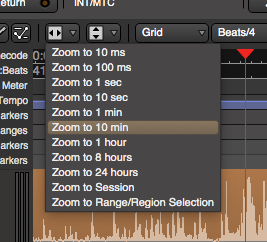
- Zoom Presets widget: this button allows the user to select from predefined zoom scales:
![]()
Zoom Focus
Menu: View>Zoom Focus
Zoom Focus provides an anchor point by which keyboard zooming occurs around. For example, some users expect the screen to zoom towards and away from the playhead (this is the default).
Additional zoom focus options are available under View>Zoom Focus. They include:
- Left : leftmost side of the summary view is anchored
- Right : rightmost side of the summary view is anchored
- Center : center of the summary view is anchored and zooming occurs around it
- Edit Point : edit point is anchored and zooming occurs around it
Track Size & Waveform Scale
Track Size
Track heights can be adjusted using one of several methods:
- Grab the bottom edge of a track header to adjust its height with the mouse.
- Right-click on a track header, and choose the Height submenu
- Select a track and use View->Fit ( shortcut: “F” ) to fill the screen with the track contents
- Select a track, and use Track->Height from the main menu
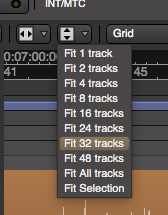
- Track Height presets: Use the button in the editor to select predefined track views:
![]()
Waveform scale
The waveform scale can be globally increased, so that quiet signals are more easily visible. Visit Preferences->Appearance->Editor:
- Linear: Displays the audio waveform in a linear fashion.
- Logarithmic: Displays the audio waveform so that quiet sounds can be more easily seen on the screen. The display is disproportionate. This setting does not change the gain of the signal, it is strictly a visual aid.
Post your comment on this topic.