
The “monitor section” is a signal path that may be inserted between the master bus in Mixbus and the input of your interface, particularly useful if you do not have a good hardware monitor controller in your setup. The Monitor Section allows you to control what you hear, without affecting the main mix which will be exported. It is important to avoid using the master bus fader as your “volume control” while mixing, because changes to the master fader will be applied to your final mix, which not only changes the volume of the mix, but can also affect any post-fader processing (such as the Master Bus Limiter or the Tape Saturation on the output bus). Instead you should use the master bus to set the level of the final mix, and use a separate volume control to adjust your “listening level”. The Monitor section in Mixbus provides a way to do this, and more.
This “listening level” can be provided by your laptop speaker volume, your powered speaker volumes, a mixer, or a dedicated monitoring solution. In many cases, such as mixing on-the-go with headphones and no external gear (among many other examples), the Mixbus “monitor” section might be the preferred option for controlling your listening volume.
The monitoring section serves these functions:
- It provides a “volume control” that can be used to adjust your listening level, without affecting the level of your actual mix.
- It allows some conveniences such as “mono”-izing your mix, or muting speakers, so you can audition your mix in mono.
- Because the monitor path provides a separate listening path outside of the mixer, it is possible to send Solo’ed tracks to the monitor, without affecting what is happening to the main mix. This is called AFL or PFL soloing. (more details below)
- It allows the insertion of plugin processors. These processors can be used for room EQ or other corrective measures. The processors only affect the listening path, not the main mix.
- It allows the selection of any physical output ports on your D/A converters. This can be used to switch between alternative monitoring systems.
The monitor panel is added or removed in 2 ways:
- selecting Session -> Properties – > Monitoring -> “Use Monitor Section in this session”:

OR
- selecting Session -> Monitor Section -> “Use Monitor Section”:

Once activated, the monitor section will be visible on the rightmost side of the Mix window as shown.
The Mixbus Monitoring Section:

Examining the Various Volume Controls in a Typical System
The Volume Control on Your Monitors
Usually you can find a volume control on your monitors (if they are active) or on an outboard amp (if they are passive). This volume control is suited to calibrating your monitors to a reference SPL. Once calibrated you can forget about this control other than periodic re-calibrations (SPL calibration of monitors is beyond the scope of this document but much information is available on the internet).
The Audio Interface, or external Monitor Controller
Some people prefer to use a Monitor Controller to control the DAW output, as well as a few other sources, that can also drive multiple sets of speakers and headphones. These devices have various features that allow you to control exactly what you are listening to. Sometimes, audio interfaces can also provide this functionality with either a hardware or software based volume control that accesses the internals of the interface. Some are elaborate and some are simple; consult the documentation for your interface to find details.
The Master Fader
The pitfall of using your master fader as a monitor level control:
Lets say you adjust your master fader to achieve the ideal monitoring level, and later you attenuate it to give your ears a break. If you forget about this attenuated setting it could easily lead you to make some poor mixing decisions later. Additionally, you may print your mix at this attenuated level (bad mix decisions and all) and not realize it. And, the dynamic tonality of the mix can be modified if you lower the master fader and the output “hits” the Master Bus Limiter and Tape Saturation differently, providing more or less limiting and saturation.
PFL or AFL Headphone setup.
Sometimes you want to solo tracks to hone in on a problem track or isolate a certain sound in your mix but have this soloed track just go to your headphones and not affect the entire mix. This can be useful in a live environment whether for a live stream in the studio or an a live venue.
To set this up:
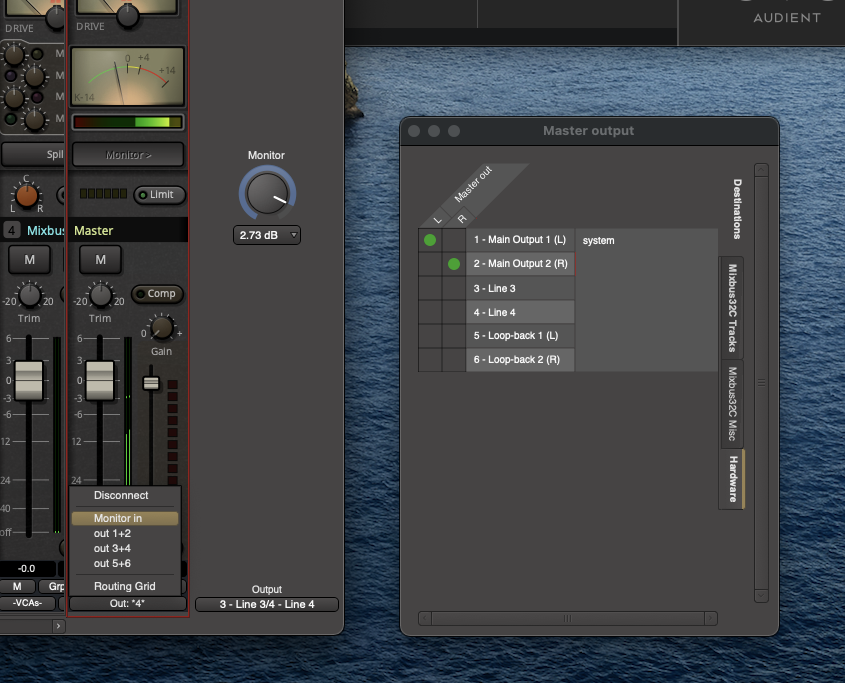
1. Assign the Master Bus to “Monitor In” so your main mix will feed the Monitor Bus
2. Open the Routing Grid and chose Main Output 1 and 2 to send to your studio monitors or main speakers of the venue
3. Assign the outputs of your Monitor Bus to where your headphones are connected. In this example I have them routed to 3 and 4
To test this setup assign your Solo mode to PFL or AFL. You will now hear your soloed tracks just in your headphones and will not affect the main mix you are sending out to your monitors.
Post your comment on this topic.