
This topic will reference the Editor, Mixer, Recorder and Cue windows. These are the four primary windows that are used to operate Mixbus as of Version 8. You can navigate between the windows using the buttons at the top right corner of Mixbus:
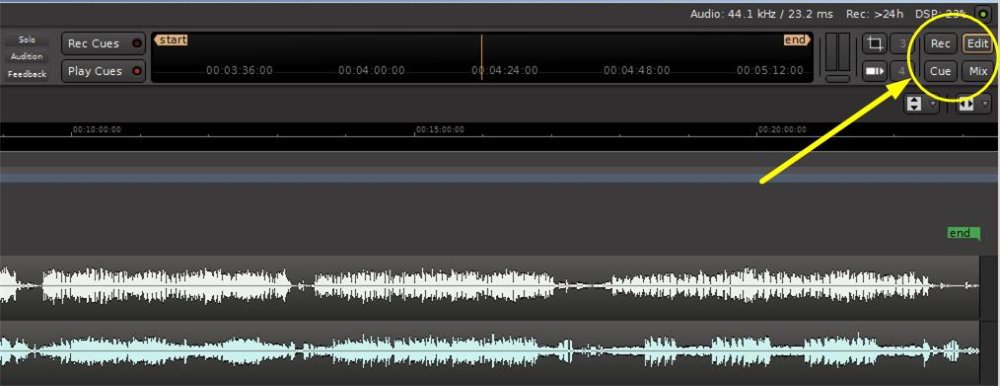
The Mixer, Editor and the Record buttons and pages are the same as in previous versions of Mixbus. New in v8 is the Cue page which also has a dedicated button.
You can detach any screen by right-clicking on a button and choosing the Detach option, or by dragging the button to the Desktop. This is useful in multiple monitor setups.
The Transport Toolbar
The top portion of the Mixbus main window is dedicated to the transport toolbar. The transport toolbar provides transport buttons ( Play, Stop, Rewind ), the main Clock Displays, and the mini-timeline. You may add or remove elements from the transport toolbar in Preferences->Appearance->Toolbar. For example, when recording you might wish to show the “Punch” and “Monitoring” controls; but then you can remove those when need more room for the tasks of editing and mixing.
![]()
The Editor Window
The first main window in Mixbus is the Editor window. The Editor window presents the Audio, MIDI and Cue tracks that make up your session. You can reorder, resize, and rename the tracks from the Editor window. Generally speaking, the Editor window provides all the features you need to edit your arrangement, while the Mixer window allows you to balance the sounds in the arrangement so they can all be heard.
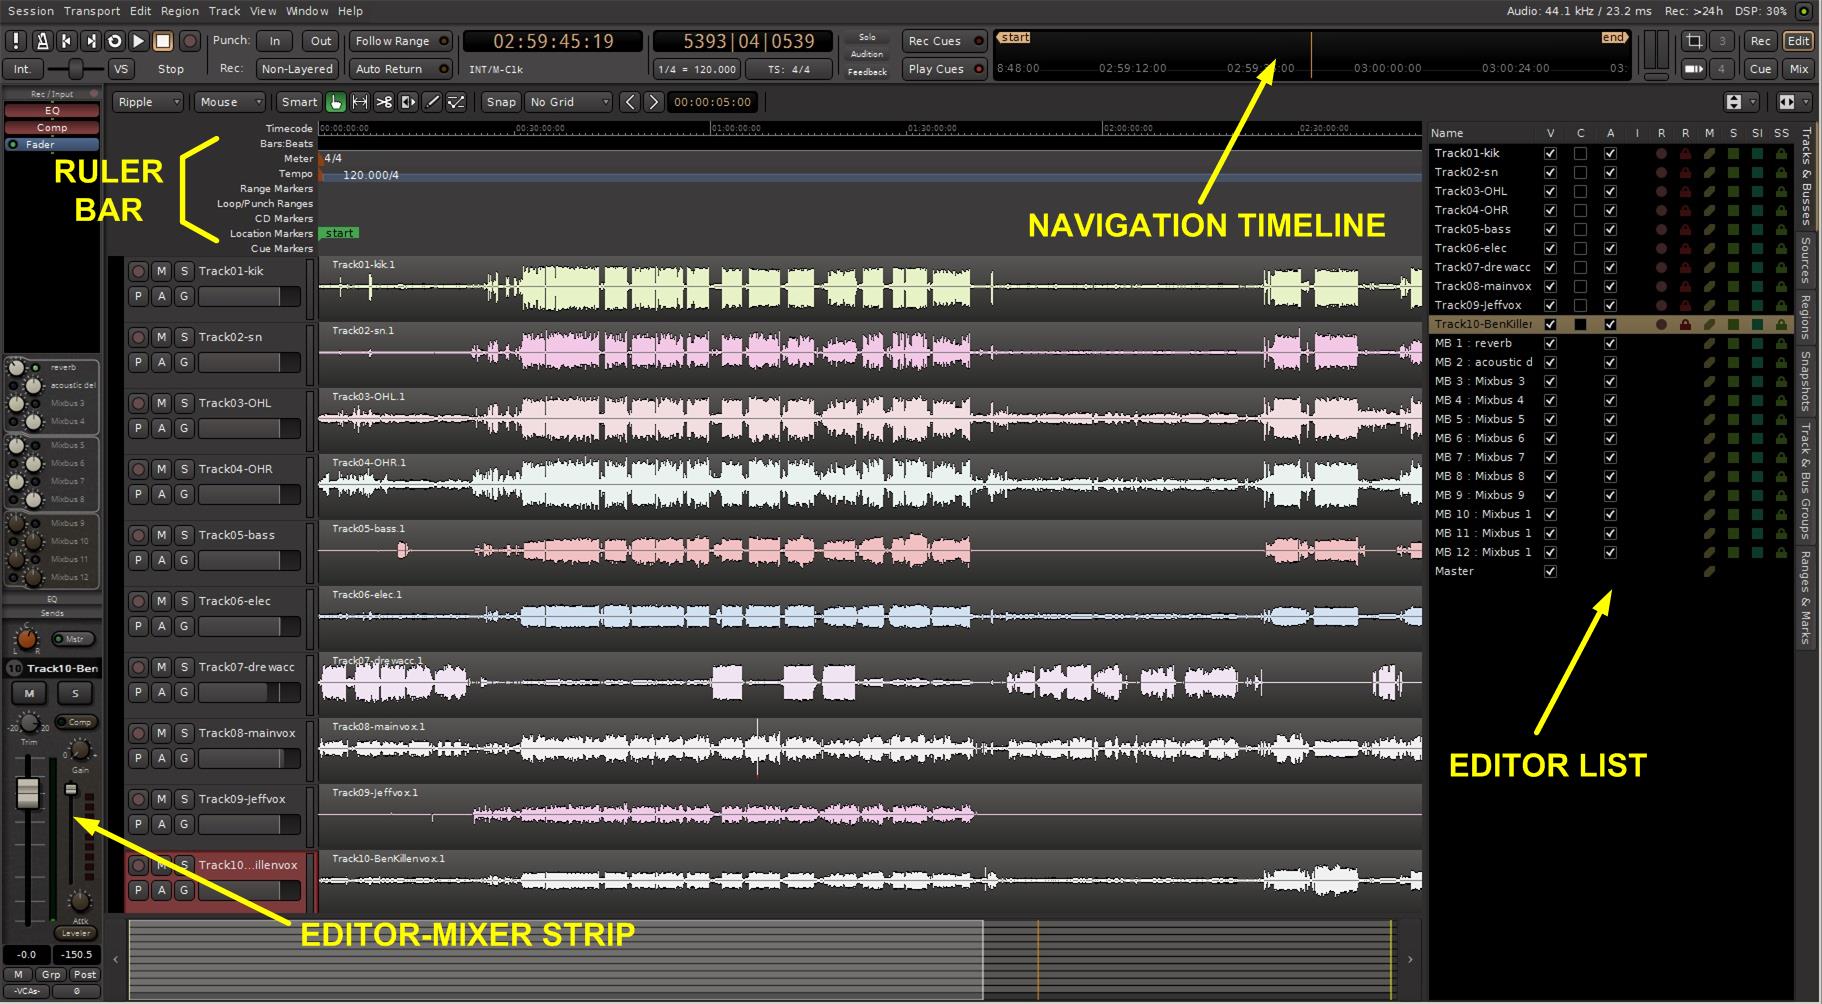
The top of the editor screen provides the transport buttons ( play, stop, etc) as well as the main clocks that display the location of the playhead in the session. Just below the transport buttons are the editor tools which are used to edit your arrangement.
The top right of the editor screen provides the Mini-Timeline, which allows you to jump around the timeline. Left-click to jump to a specific place, or scroll the mouse wheel while hovering over the timeline to jump around. You can hold down Control for finer jumping, and Control+Alt for still finer jumping. Right-clicking on the Mini-Timeline allows you to select a time display range. If you create Location markers, they will appear on the Mini-Timeline. You can click on a marker to jump to that location.
Just below the editing tools, you’ll see the ruler bar which helps to indicate your timeline position using Min:Sec, timecode, samples, bars/beats, as well as providing a place to set Markers, Time Signature or Tempo changes, and Loop and Punch ranges. Learn more about the rulers here.
The main editor canvas shows your tracks, and any regions (selected slices of an audio track) that are present.
On the right of the editor is “Editor List”. The Editor List may be shown and hidden via the “View” menu. Learn more about the Editor list here.
On the left of the editor is the “Editor Mixer”. The Editor Mixer shows the mixer channelstrip for the currently-selected track or bus. The Editor Mixer may be shown and hidden from within the “View” menu or the associated keyboard shortcut (Shift+E by default).
The bottom of the editor is the Summary view. The summary view shows a light grey box that encompasses your current view, with the entire session behind it. You can move the grey box around your session to quickly move your view. The Summary may be shown and hidden via the “View” menu.
The Mixer Window
The Mixer Window may be shown using the “Window” menu, or the keyboard shortcut (ex: Alt/Opt+M) which toggles between the editor and mixer windows. If you have the editor and mixer windows on different monitors (screens), then the “Toggle Editor/Mixer” shortcut does not have an effect.
When viewed in the Mixer Window, Mixbus resembles a traditional analog console. Input Channels are on the left, while the busses and master are located on the right side.
The audio signal flow is generally left-to-right. The signal starts at the input channels (which might be live inputs, playback tracks, MIDI tracks, or virtual instruments), progresses through the mix buses, and into the master. The signal path’s EQ, Filter, Compressor, panning, bus summing, and master bus processing are performed inside Harrison’s proprietary signal path, are always present, and do not require user-supplied plug-ins.
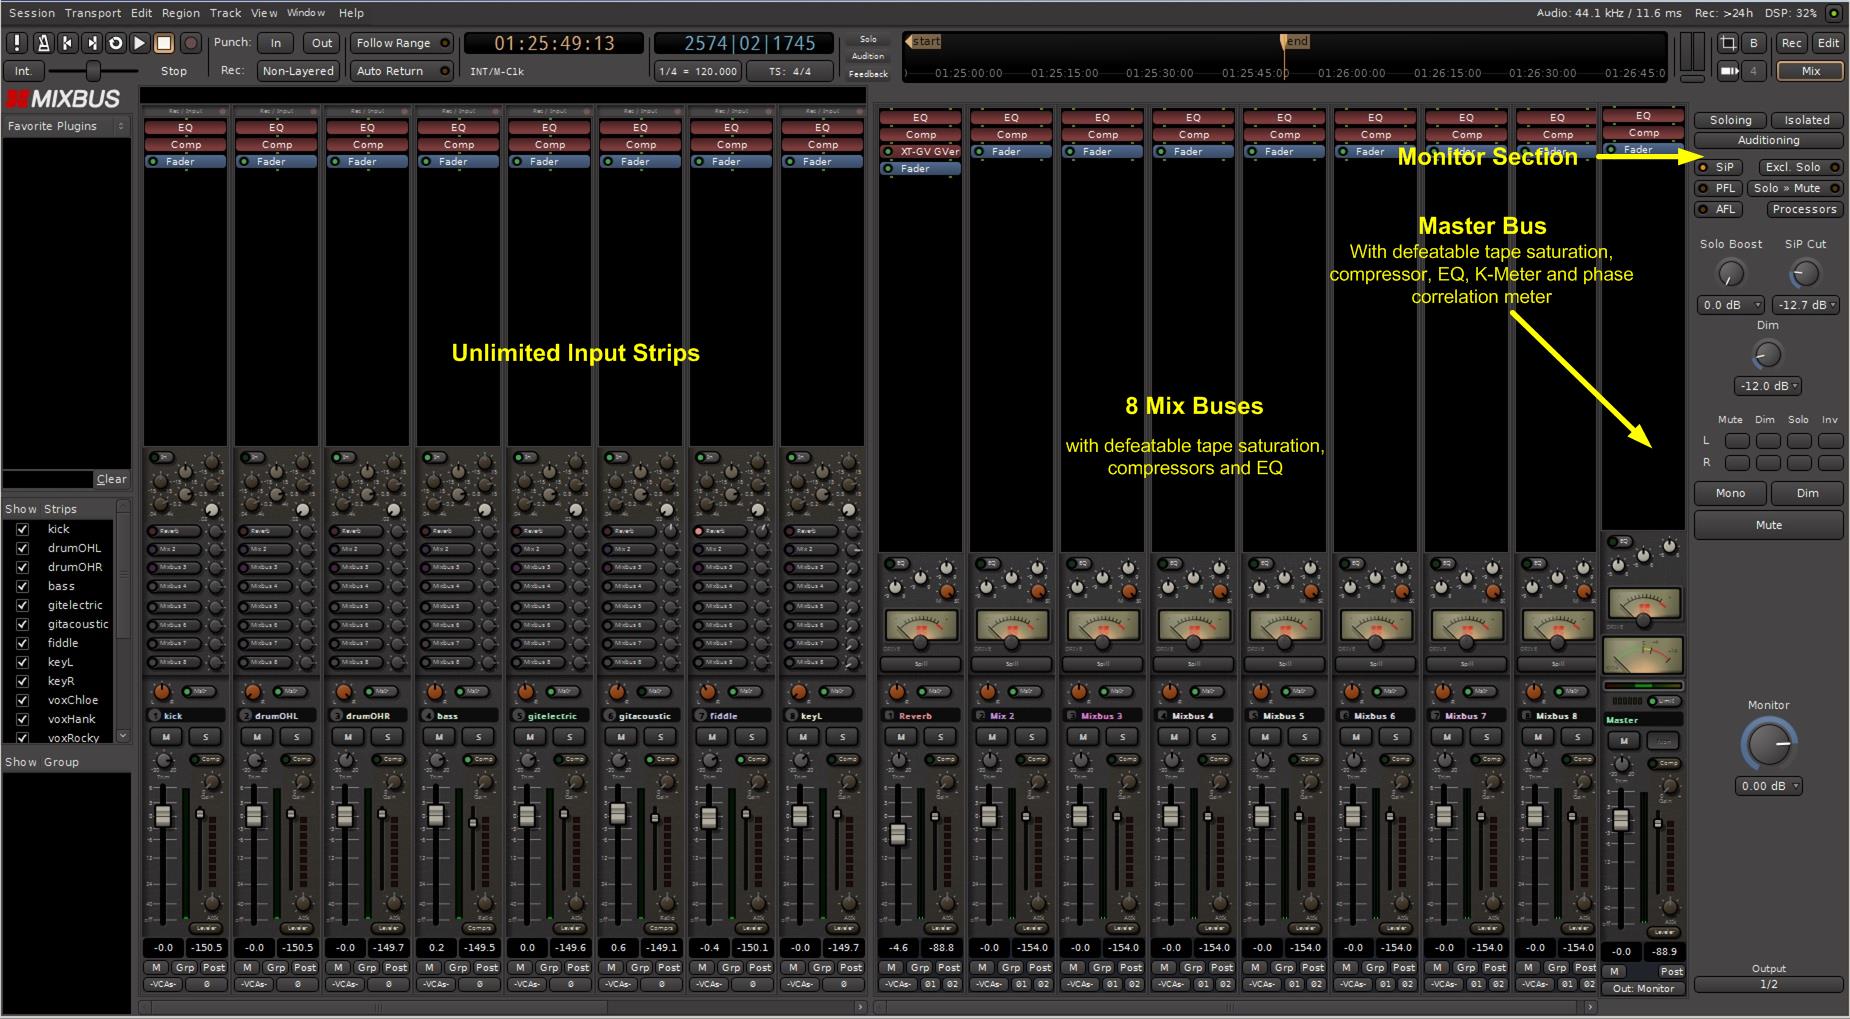
In Mixbus, like other audio workstations, each recording track has its own mixer strip. These mixer strips resemble the input channels of a traditional analog mixing console. Input channels can be configured to be mono or stereo and by default include all the DSP processing that makes up a real console channel. This is the major difference between Mixbus and other DAW mixers. No time is wasted searching for and adding the necessary high-quality mixing tools.
Just to the right of the input channels are the 8 mix bus channels. Mix bus channels are used to collect the outputs from the input channels into groups. For example, in a typical music project, you might send the drums to mix bus 1, the vocals to mix bus 2, instruments to mix bus 3, and use mix bus 4 as a parallel effects bus, like reverb. This allows you to easily adjust the relative levels of these groups and apply processing to them.
The master channel is the final mixer strip on the right. Typically, the master channel will be connected to your monitoring system (speaker outputs). The output of the Master channel is the final output of your project i.e. your 2 track master file. This output is rendered to the final .wav file when you export the session.
The monitor section on the far right is has been made available for those who do not have access to a dedicated external monitoring section.
The Record Window
New in Mixbus v7, the Record window allows rapid access to all recording controls. This picture shows an example:
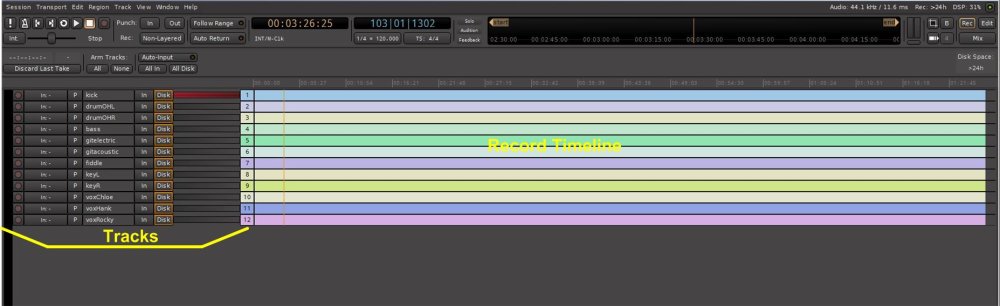
Looking around the Record Window we see the following sections:
- the Transport toolbar remains as on the Mixer and Editor windows
- a section representing the tracks in use, with buttons to control track arming, input source, playlist, track name, and monitoring options, and a horizontal meter
- to the right of the track controls is a timeline which shows record status vs. time for each track
- there is also a recording counter, and global track arming and monitoring buttons
More details about the Record window can be found in the topic page titled Record Window
The Cue Window
Cues and clips are managed in the Cue window, which is accessed by a button in the upper right of any Mixbus page:
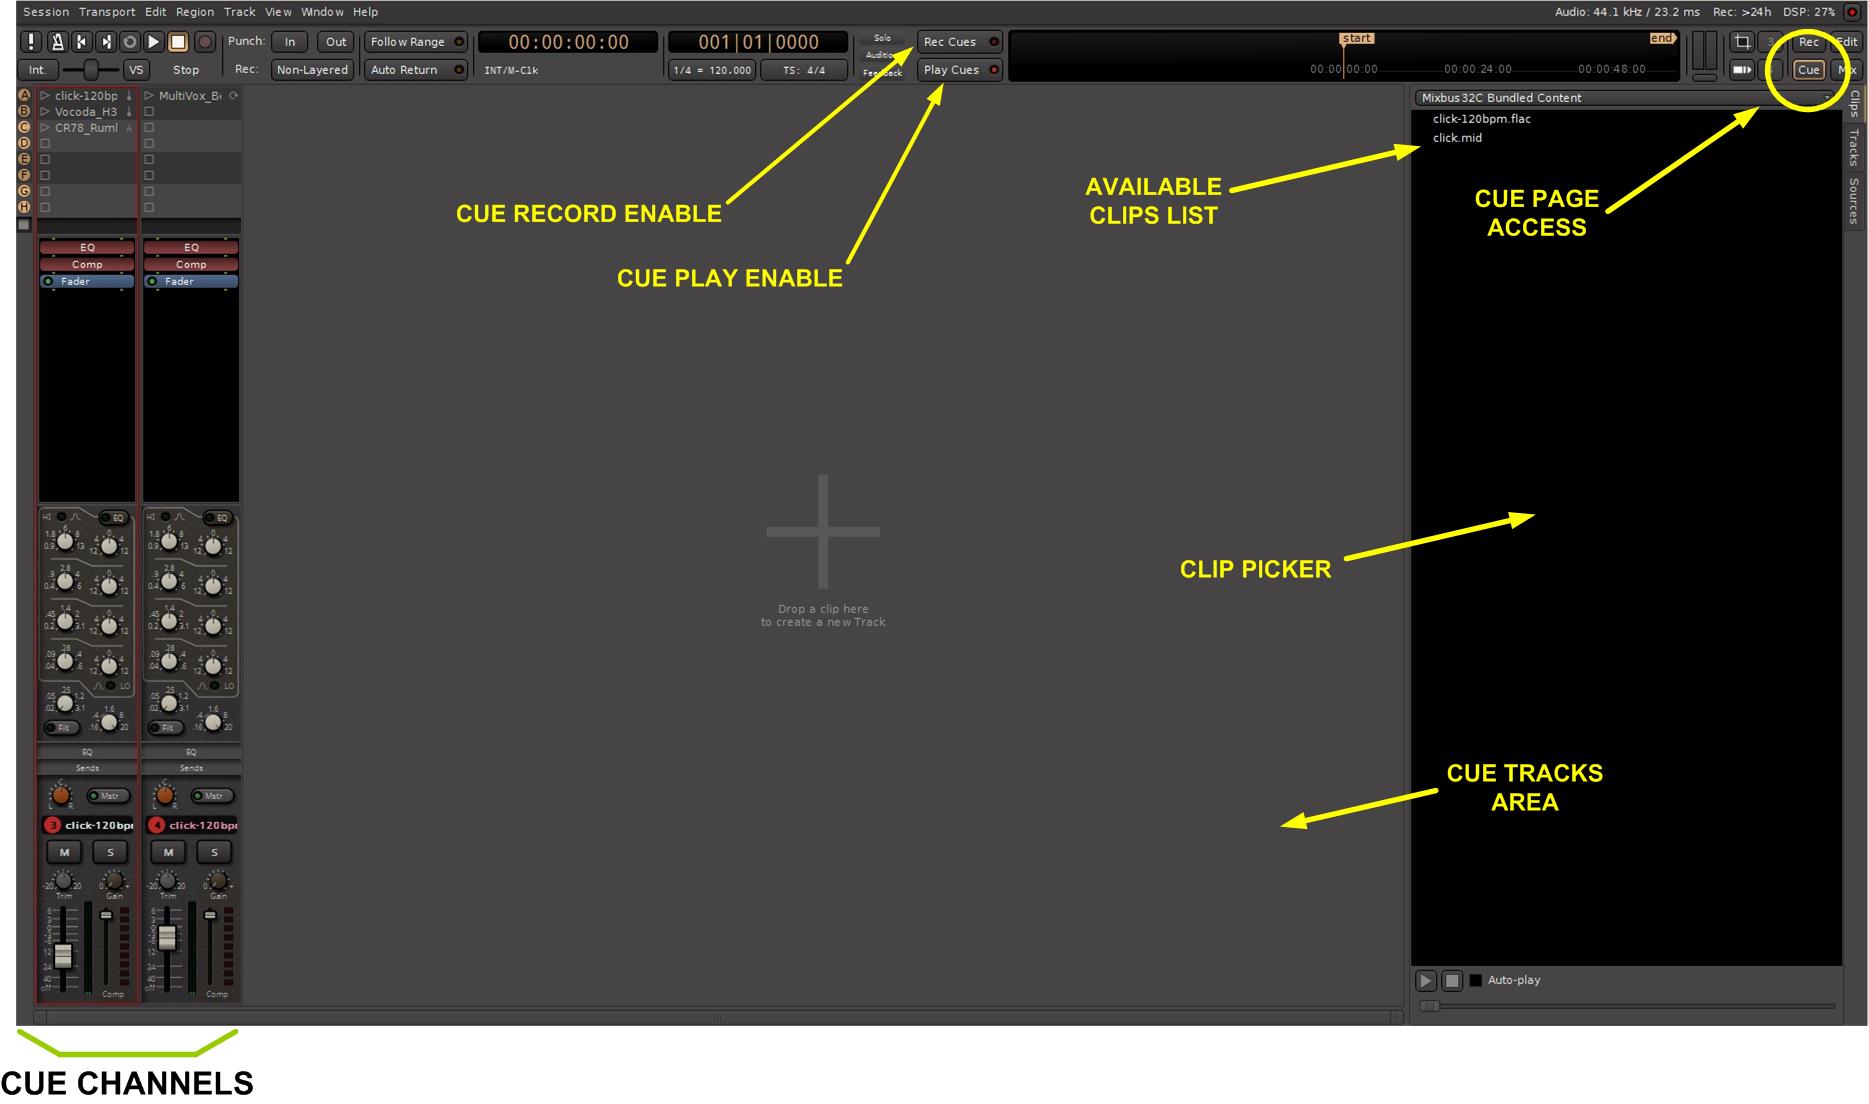
A Cue Channel or Cue Strip can be thought of as an audio or MIDI track that contains a list of audio or MIDI clips. In the case of a Cue Channel containing audio clips, the audio comes from these audio clips rather than an actual audio input or recorded track. A Cue Channel containing MIDI clips does not create any sound on its own, but outputs MIDI information to an internal software synthesizer or external synthesizer, both of which DO produce sound from the MIDI information in the clip. As Mixbus by default contains a generic MIDI synthesizer, sounds may be heard from MIDI clips by default.
More details about the Cue window can be found here: Triggering Clips and Cues
Maximize Mixer/Editor space
The “Maximize” commands can be found under menu> View. Enabling this function causes the editor window to occupy all screen real estate. The title bar will be hidden as will the task bar. The exact behavior of this function depends on your OS’s desktop “fullscreen” conventions. The same function is available for the Mix window. To exit this mode uncheck Maximize Editor in Menu>View. ( if you are unable to see the main menu, try moving your mouse to the top of the screen, and wait for the main menu to appear )
Post your comment on this topic.