
Please watch the following video for an overview of exporting features in Mixbus:
Differences between Bounce, Consolidate, and Export
Mixbus has multiple ways of “rendering” audio into contiguous audio files.
Bounce
The least-used method, “Bouncing” is a way to store a drum hit or sound effect that will be reused later in the project. A new region will be created in the region window. The bounced region will have the region’s gain, gain curve, and fades applied to the audio. You can later drag this region back into the project wherever you need it.
To initiate a Bounce action, right-click on a region and choose “Bounce”. A new region will appear in the Editor List, inside the “Region” tab.
Consolidate
“Consolidate” allows you to select a time-range consisting of many regions, and create a single region on the timeline. This can simplify future edits or exporting operations, because the various layers, gain curves, fades, and other region properties are made into a single contiguous audio region which can be manipulated more easily.
To initiate a Consolidate action, you will select a time-range with the Range tool (this can consist of multiple tracks), right-click on the Range, and choose Consolidate. The regions under the selection will be consolidated into contiguous audio regions.
Exporting
“Exporting” is used to generate one or more files, outside of the Mixbus session, in the file-location and format that the user defines. “Exporting” is how you create the final stereo output file of a song, or a series of songs and markers for a CD, or a video for posting on YouTube.
There are many ways to initiate an “Export”, and Mixbus supports many, many options. A single Export event might generate multiple files, in multiple formats, with multiple different , and with or without metadata such as CD markers, song names, etc. Exporting is probably one of the most complicated (but powerful) features of Mixbus.
Exporting to an Audio File
Once a mix is ready for delivery, you will need to generate a final output from Mixbus. There are several ways to initiate an Export from Mixbus; each method helps to define the tracks that will be exported, the start/end times of the exported file, and the format of the files to be created.
Initiating an Export
There are 5 common ways to initiate an export:
- Session>Export>Export to Audio File(s)
- Session>Export>Stem Export
- Session>Export>Export to Video File
- (Selected Region)->Right Click->Export
- (Range Selection)->Right Click Menu->Export
Export to Audio File(s)
This method initiates the most common export. The Export dialog will appear, prompting you for details such as the exported filename and location, the file format, and the time-ranges that you would like to export.
Stem Export
This initiates an export of individual tracks. In the “Channels” tab, you may select whether to apply the channel processing, or to leave the track contents unaffected. Each track or bus will generate a separate audio file. If you choose multiple timespans, then you will receive a separate audio file per time span.
Export to Video File
This initiates an export similar to the main session export, but it generates a video file by combining the video track with the master-bus outputs.
Region export
This simply exports the selected audio region into any format that the user chooses. This does not include any mixer-strip or plugin effects.
Range export
This initiates an export, just like the session export, but it automatically selects the selected time-range as the start/end times for the exported file.
Setting the format for the export:
In the Export window are 3 tabs across the top:
- File format
- Time Span
- Channels
File Format tab
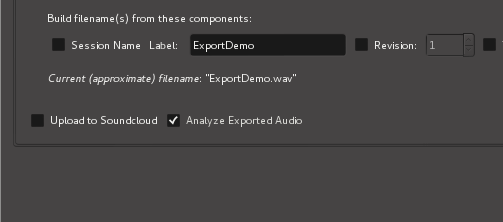
The File format tab allows control of settings such as bit depth, sample rate, compression type, location to be saved, and file name structure.
Additionally,options for generating a “Loudness Report”, as well as automated uploading to SoundCloud is available (must first have a SoundCloud account via www.soundcloud.com).
Multiple format exporting:
Many files formats may be generated and exported at one time by clicking “+ Add another format”.
- Export Session to Audio File (the most common option): This exports the entire range from the Start marker to the End marker.
- Export Selected Range to Audio File: This exports the current Range selection to an audio file (Note: this can also be triggered by right-clicking on the selected range and choosing “export range”).
- Export Selected Regions to Audio File: This exports a length of time starting at the first selected region, and continuing to the end of the last selected region.
- Export Range Markers to Multiple Audio Files: This very powerful feature allows you to export several ranges (songs) at one time. The resulting files will use the region names as the file names.
Before the export is initiated, you must choose the location and format of the exported file.
Export to File: Enter the path and file name that you wish to create. This defaults to the sessions “export” folder. Click “Browse” to see a file browser and navigate to a different folder.
- Export Source: Under the “Channels” tab choose “Master Output” to export the master bus output of Mixbus. additionally you can export individual tracks separately, or control the Left/Right assignment of tracks to the file.
- Channels: Chooses whether the resulting file will be Stereo or Mono.

Once a format(s) is chosen it may be edited.
The formats are editable using this dialog box:
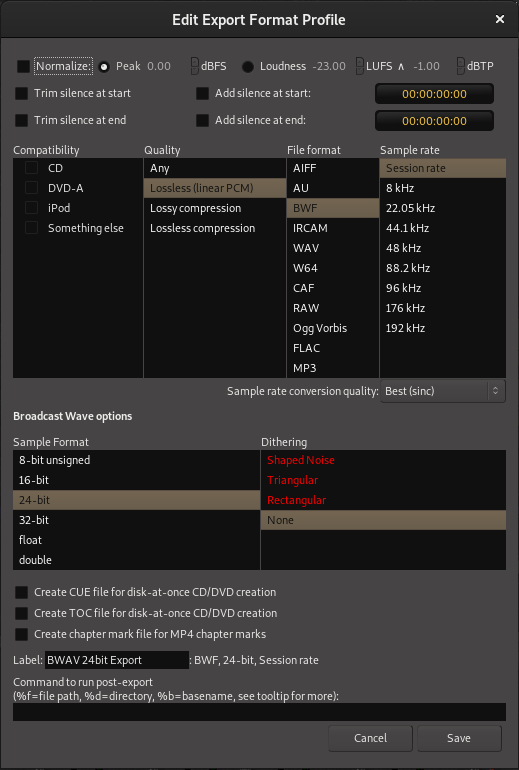
Edit Export Format Profile:
- File Format: (the list depends on the system’s available options). For CD quality,
choose WAV. - Sample Format: The “32-bit” setting means 32-bit integer format. This is ultra-high resolution but does not accommodate signals over 0dBFS. The “float” setting is 32-bit floating point which accommodates signals over 0 dBFS which is preferred in most cases. For CD quality audio choose 16-bit.
- Sample Rate: For CD-quality audio choose 44.1 kHz.
- Conversion Quality: This is only enabled if the export sample rate is not the same as the session. The setting “best” is recommended.
- Dither Type: None, Rectangular, Shaped Noise, or Triangular. The “None” or “Shaped” settings are recommended.
- CD Marker File Type: CUE & TOC. These file types may be utilized by CD-burning software to define track indexes, track names, and other metadata.
If a project is intended to be published as a CD, you will want to create CD markers so Mixbus will generate a TOC (table of contents) text file for the CD.
Label: this is the name that will appear in the list of formats.
Post-export command: this feature can be used to launch a scripted operation on the exported file. More details here: (blank)
Time Spans tab
This tab allows you to choose one or more time-spans. Each selected time-span will be exported, using the settings in the “Format” and “Channels” tabs. For example if you have 2 different formats chosen, and 2 different time spans, then 4 files will be created during the export.
Time-spans include:
- Session Start/End ( this is selected by default if you trigger a Session->Export to Audio File )
- Range Selection ( this is selected by default if you trigger the export by right-clicking on a Range ). If no range is selected, then this does not appear
- Named ranges: If you have created named ranges ( for example, your session has multiple songs on the timeline, and each is assigned a named range) then they will appear here.
Realtime Export
Use this option if your session makes use of external hardware audio processing.

Channels Tab
The Channels tab allows the user to choose which tracks or buses will be exported. The operation is slightly different, depending on the way the export was initiated.
When “Session->Export to Audio Files” is selected, Mixbus will select the Master bus for export. But the user may change this selection to choose any tracks and/or buses. Mixbus will “sum” the track outputs into a single file.
When “Session->Stem Export” is selected, Mixbus will not select any tracks or buses by default. The user must select which tracks or buses to export. Each selected track will result in one exported file. The track’s output is used to define the number of channels in the exported file. If a track is mono throughout, then it will result in a mono audio file. If the track has 2 outputs (stereo) then the resulting file will be stereo.
The selection of the “Channels” tab is combined with the “Format” and “Time Range” tabs. If you are doing a “stem export”, with 8 tracks selected, and 2 formats, in 2 different time spans, then this will result in 8×2×2 = 32 different files on export!
Export Analysis:
If you enable the “Export Analysis” checkbox, then Mixbus will display a summary of the exported file:
Export Report and Analysis
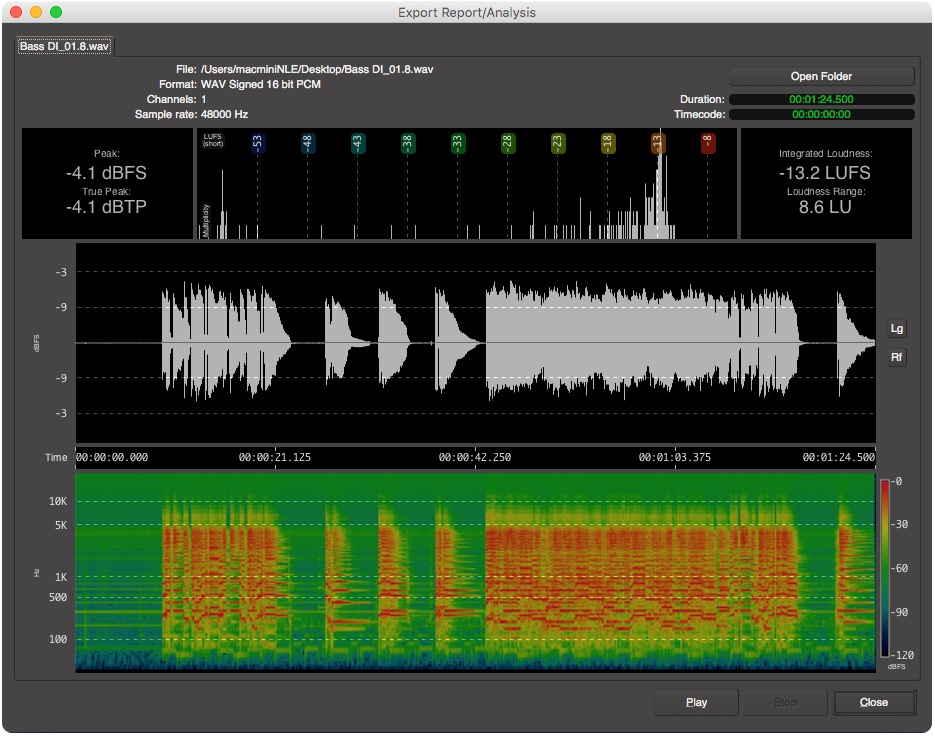
The Export Analysis dialog may be displayed after an export The export analysis window provides these features:
- LUFS loudness measurement
- LU (Loudness Unit) histogram
- LU Range
- Waveform display, with peak indicators
- Peak Sample value + True Peak value
- Spectrogram view
These tools provide you an extra level of confidence that your track sounds great and meets common deliverable requirements for distribution and broadcast.
The following video describes the export report and analysis tool in more detail.
This updated video demonstrates additional uses of exporting and export analysis.
The following video describes how to “bounce” the master bus down to a new stereo track:
The following video describes how to export multiple ranges into separate audio files:
The following video shows the “Export” features of Mixbus v2; this additional information is still sometimes useful for v3 users:
Post your comment on this topic.