
Engaging the Immersive Master Bus
If you’re ready to begin ‘immersive’ mixing, in the Session menu enable the menu item for “Immersive Surround Master”. This will prompt you to engage the Immersive Surround Master.
You can also *dis-*engage the Immersive Surround Master. This will save CPU usage, but any panning you’ve assigned to the immersive bus will be lost.
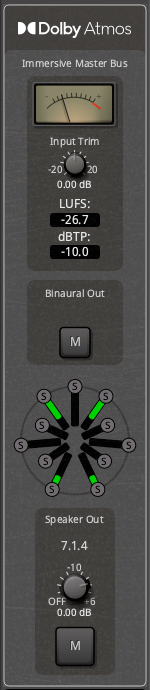
You’ll see the Immersive Master Bus appear, after the stereo master bus (and before the Monitor section, if you have one).
Panning to the Immersive Master Bus
Once you’ve engaged the Immersive Master Bus, you can manipulate the pans to move sounds around a virtual space.
For more details about the channelstrip immersive panner and its controls, visit this page: Immersive Panner Section
Monitoring your mix: Make the Output Connections
In order to hear your Immersive mix, you must make output connections to your headphones and/or surround speakers. The Immersive bus is entirely separate and parallel to the Master bus.
To learn about the binaural and speaker connections, visit this page: Speaker and Binaural Output Connections
Finalizing your Mix for delivery: checking loudness and exporting the ADM file
After mixing, you’ll be ready to check the loudness compliance and export a file for delivery.
To learn more about metering and loudness, continue to this page: Meters, Modes and Loudness
To learn more about exporting the file for deliver, continue to this page: Exporting a Dolby Atmos ADM file
Before getting started with your Immersive mix, you should consider which of these workflows is best suited to you:
Mixing from stems
In this workflow, you take the (mono or stereo) “stems’ from a prior session, and remix them with Atmos. In this case, the stems often have compression and effects already added. This is the easiest way to create an immersive mix. You’ll likely choose a position (front, back, or overhead … or some combination) for each stereo pair of stems.
Since you aren’t using the stereo bus, you can just mute it, and focus on making your mix on the immersive bus.
Migrating a Mixbus stereo mix to Immersive
If you’ve already developed a stereo mix in Mixbus, you might want to ‘sweeten’ it slightly for immersive. Many elements (like your stereo drum subgroup) can be assigned directly to the front left and right speakers.
When combining stereo and immersive mixes in the same session, it’s recommended to make a new snapshot from your stereo mix, when you make your immersive mix. With a snapshot, you can have both mixes stored in the same session folder and sharing the same audio files. But your edits, mixes, and automation can vary slightly between the 2 mixes, and changing one snapshot will not affect the other.
In the Immersive snapshot, you’ll likely want to remove any plugins on the Master and Monitor buses, as these are not delivered to the Immersive Master bus, and they are often a source of significant cpu/dsp usage.
Starting an immersive mix from raw tracks
Finally, if you want to focus entirely on your immersive mix, you can start with raw tracks and develop your mix using only the immersive panner and mixbus subgroups.
A purely immersive mix can use more creative panning, more ‘space’, and fewer plugins. Immersive mixing is well-suited to sound design and immersive/
Post your comment on this topic.