
The Preferences window can be found under the menu item Mixbus->Preferences in OS X, and under the menu item Edit->Preferences in Windows and Linux.
In Mixbus 32C v7, the Preferences window has been rearranged to better group associated menus together
The preferences window is organized by category in the left hand column of the window. Some categories have subcategories that you can navigate by clicking on them:
General
Audio/MIDI Setup
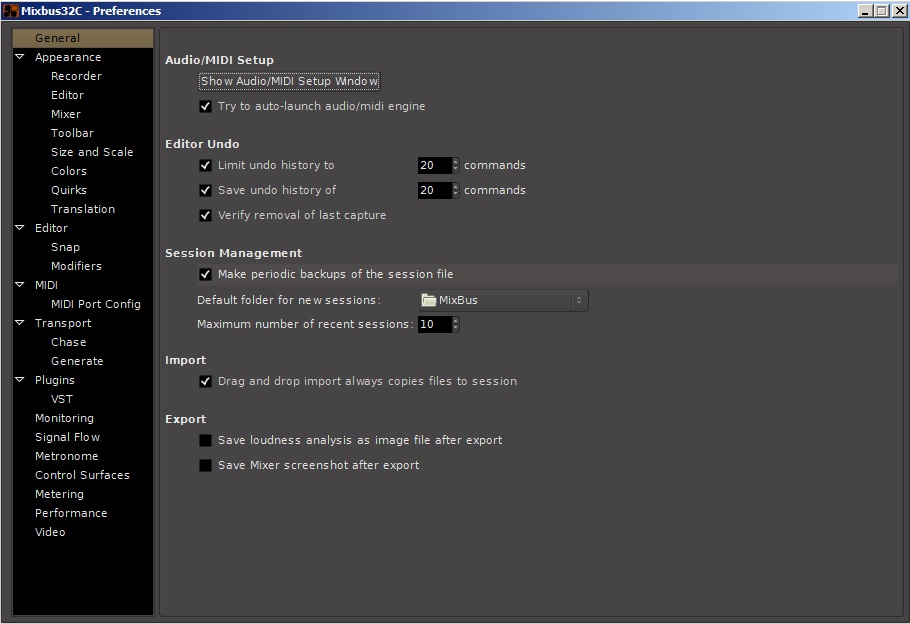
This button will open the Audio/MIDI Setup Window. Details for this window can be found here: Audio/MIDI Setup
Checking the box “Try to auto-launch audio/midi engine” will start the audio engine without opening the “Audio/MIDI Setup Window” when you open a session . The “Audio/MIDI Setup Window” will only open if there is a problem with the I/O interface or any of the other parameters in the setup.
If the box is unchecked, the “Audio/MIDI Setup Window” will open every time you open a session.
Editor Undo
These check boxes allow you to control the number of undo levels and history depth when editing.
Limit Undo History
This option should be enabled to limit the memory and disk space that Mixbus will use to store Undo information. Select a number of operations that you’d like Mixbus to remember within a given session.
Save Undo History
This option specifies how many commands are available to undo after a session is saved and re-opened. Previous commands from prior work on the session will still be available to undo even when a session is first re-opened.
Verify removal of last capture
When this option is enabled, Mixbus will display a confirmation message when the “stop and remove last capture” action is used.
Session Management
Make periodic backups of the session files
If this is enabled, Mixbus occasionally creates a date-stamped snapshot in the session’s “backup” folder. Mixbus stores a backup snapshot every 5 minutes, but this might be delayed if the transport is playing or recording. To recover from a backup snapshot, visit our support FAQ: Session Auto Backup
Default Folder for new Sessions
This option specifies the default location that appears in the New Session dialog pulldown.
Maximum Number of Recent Sessions
This option defines how many sessions will be displayed in the New Session dialog list.
Import
Drag and Drop Import
If this box is checked, files that are drag & dropped into the session will be copied into the session, rather than “referenced” from their existing location, wherever that may be (such as on a removable hard drive). In cases where you work extensively from external sound libraries or loops, and you don’t want to store redundant copies of those audio files in the session, you might choose to disable this option. Recorded files are still stored inside the session folder.
Export
When an export is performed and these checkboxes are enabled, Mixbus will also save an image file of the resulting loudness analysis and a screenshot image of the mixer page. This can be a useful record to keep with your exported master file.
Appearance
Theme
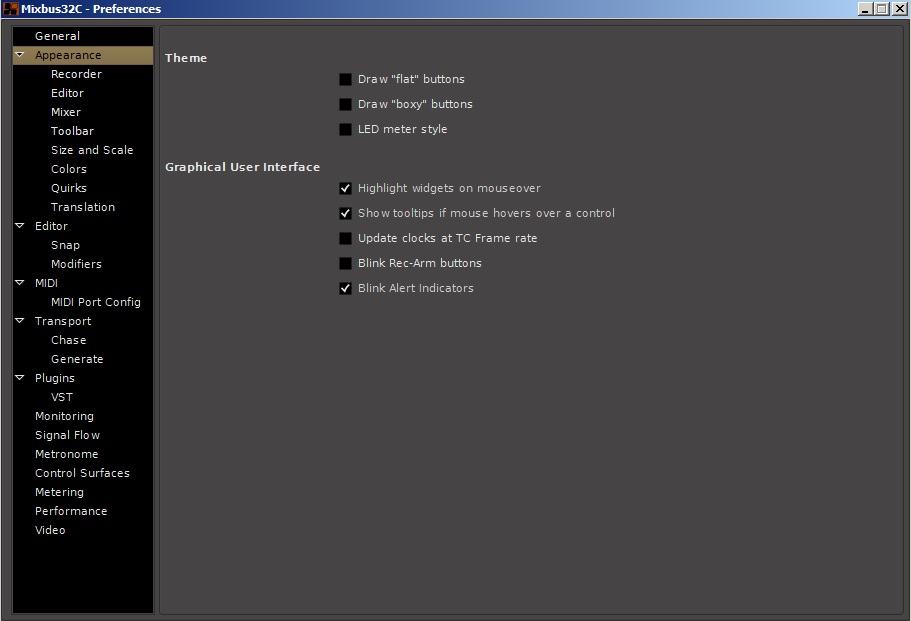
Draw “flat” buttons
Removes gradients from the buttons (may result in easier viewing on some monitors).
Draw “boxy” buttons
Selects between rounded or square corners (may result in easier viewing on some monitors).
LED Meter Style
If this option is enabled, the Meterbridge meters will appear with segmented “LED style” meters instead of a solid bar.
Graphical User Interface
Highlight Widgets on Mouseover
If enabled, widgets will be “highlighted” when the mouse passes over them.
Show tooltips If Mouse Hovers Over a Control
Update Clocks at TC Frame Rate
Normally clocks update approximately 10 times per second. This option will cause the clocks to get updated at the selected video frame rate, for those users who need to watch the frame counter more accurately.
Blink Rec-Arm Buttons
This option blinks the track rec-arm buttons; this can be a more obvious indication when a track is armed.
Blink Alert Indicators
This option blinks the Alert indicators “Solo” “Audition” “Feedback” at the top of the screen when they display.
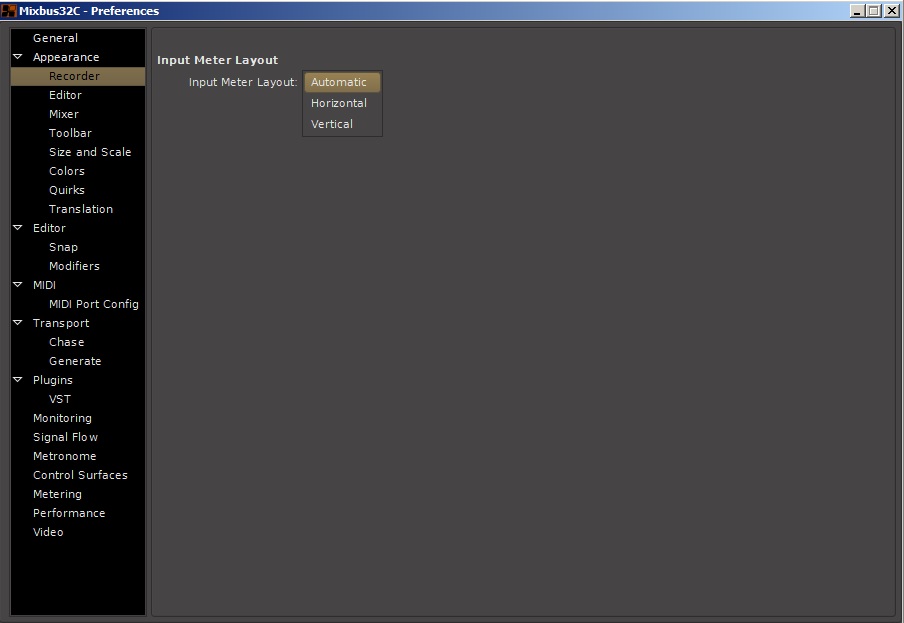
Recorder
This selector controls how physical inputs are displayed in the Record window. “Automatic” will display the physical inputs horizontally up to 16 inputs, and vertically for larger numbers of inputs. Alternately you can select all horizontal or all vertical regardless of the number of inputs.
Editor
General
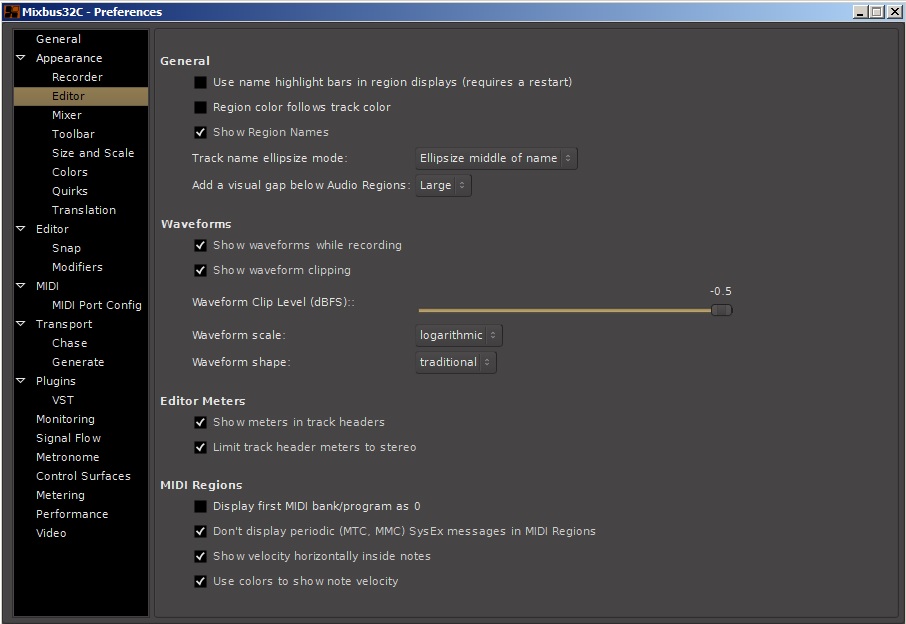
Use name highlight bars in region displays
This option toggles the display of the highlight bars with names at the bottom of each region, as was default in earlier versions of Mixbus.
Region color follows track color
When enabled, regions are drawn the same color as the track. If disabled, all regions will be the same color, not affected by the track’s selected color.
Track name ellipsize mode
This selector applies to the track name displayed at the left of each track in the Editor window. When the track name is too long to be completely displayed, you can select leftmost, center or rightmost part of the name to display.
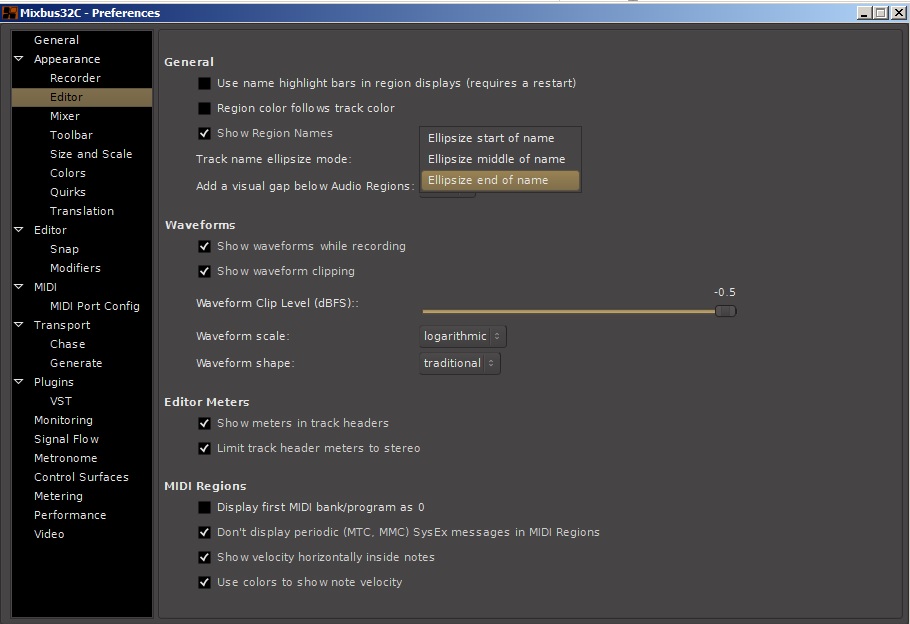
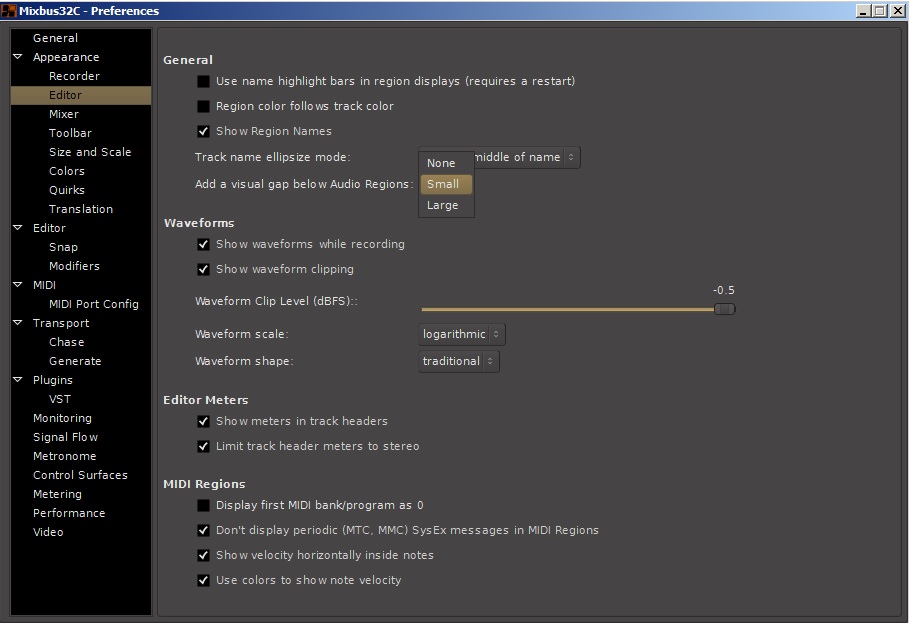
Add visual gap below audio regions
This selector controls the vertical spacing of the tracks in the editor window. You can select a gap size or no gap between tracks.
Waveforms
Show waveforms while recording
This option toggles whether to display region waveforms during recording. It is a useful reference, but does use more system resources. It’s ok to leave on in most modern computers.
Show saveform clipping
This option toggles the indication of waveform clipping in the region display. If disabled, regions will not show red indicators when a region exceeds 0dBFS.
Waveform clip level
This option gives you a horizontal fader to adjust where the waveform clip level is calculated, from 0 to -50dBFS.
Waveform scale
This setting does not change the gain of the signal, it is strictly a visual aid that makes the waveforms appear “fatter” with two different waveform rendering scales. The two options are:
- Linear: Displays the audio waveform in a linear fashion. This is the most common display scale in most DAWs.
- Logarithmic: Displays the audio waveform so that quiet sounds can be more easily seen on the screen. The display is disproportionate, giving more visual resolution to low-level signals and less visual resolution at higher-level signals.
Waveform shape
This setting does not change the gain of the signal, it is strictly a visual aid. The two options are:
- Traditional (Default): Waveforms are drawn around a “zero” axis in the middle of the region.
- Rectified: Waveforms are drawn with “zero” on the bottom of the region, and the wave values are shown in an absolute-value (rectified) magnitude offset
Editor Meters
Show meters in track headers
This option toggles whether meters are shown in the track headers in the editor window. Disable this to hide the small meters at the right edge of track headers in the editor. Enabling this option is useful to help monitor & identify tracks as you listen, but uses more system resources.
Limit track header meters to stereo
If this option is enabled, then Mixbus will only show stereo meters in the editor’s track header, even if the plugin has many outputs.
MIDI Regions
Display first MIDI bank/program as 0
By default, Mixbus shows banks&programs starting with “1”. This option shows the more technically-correct numbering starting with “0”.
Don’t display periodic (MTC, MMC) SysEx messages in MIDI Regions
Check this box to prevent SysEx message events from being visible on a MIDI track.
Show velocity horizontally inside notes
Use colors to show note velocity
These boxes allow you to control how note velocity information is displayed in a MIDI track.
Mixer
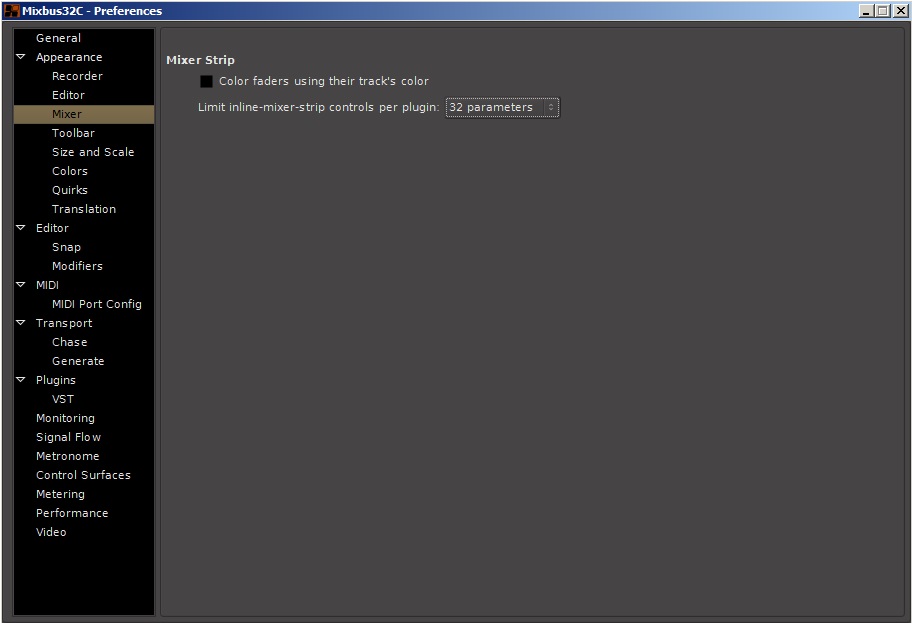
Mixer Strip
Color faders using their track’s color
When enabled, the mixer fader “knob” will be colored in accordance with the track’s color.
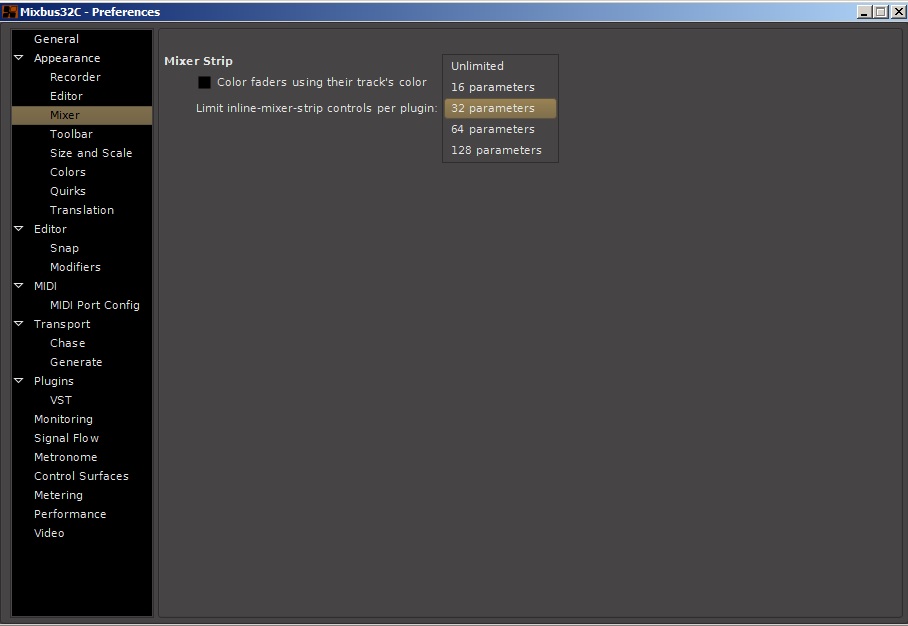
Limit inline mixer strip controls per plugin
This selector controls the total number of plugin controls that can be displayed in the plugin area of a mixer strip.
Toolbar
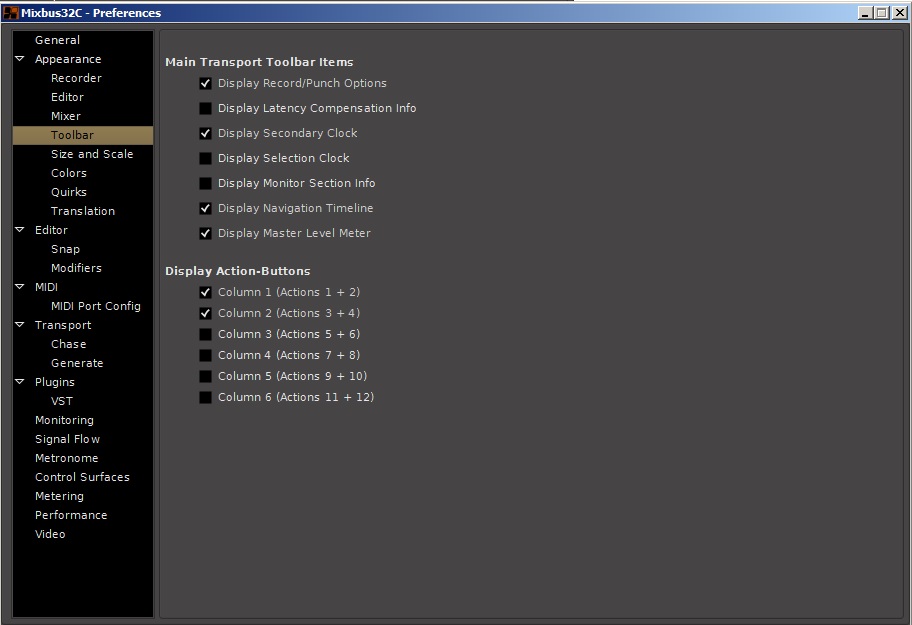
Main Transport Toolbar Items
These checkboxes select the controls provided in the Transport toolbar. For example, “Display Master Level Meter” will display or hide the master level meter that appears in the top-right corner of the editor window.
Display Record/Punch options
Display Latency Compensation Info
Display Secondary Clock
Display Selection Clock
Display Monitor Section Info
Display Navigation Timeline
Display Master Level Meter
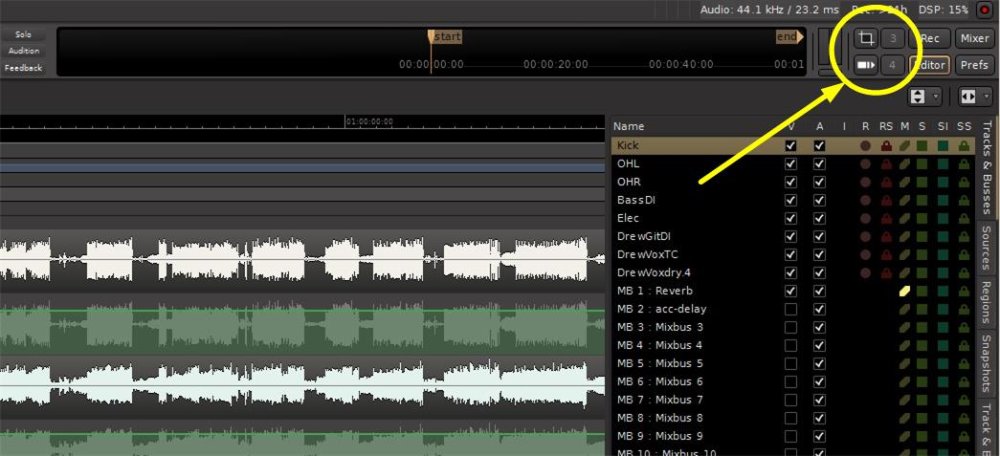
Display Action-Buttons
These checkboxes control how many shortcut buttons are available in the toolbar. Shortcut buttons are discussed in the section Primary Windows: Editor, Mixer and Recorder.
In this picture 4 shortcut buttons are displayed, however the checkboxes allow display of up to 12 buttons.
Size and Scale
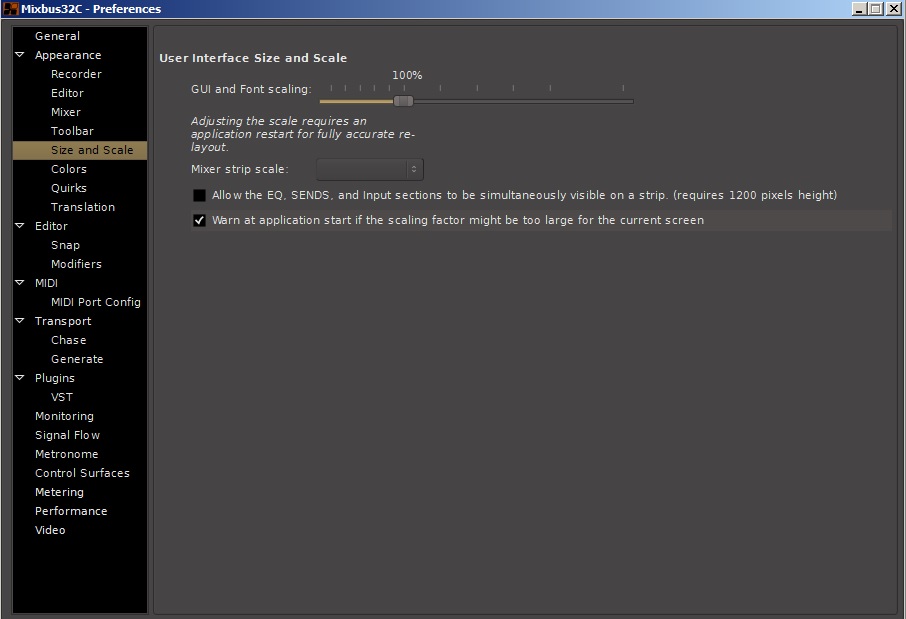
Adjust this value to increase or decrease the text used in menus, buttons, and dialogs. 100% is the default value. Settings below 80% may be difficult to read. Adjusting the scale requires a restart, so buttons can resize themselves to fit the new text size.
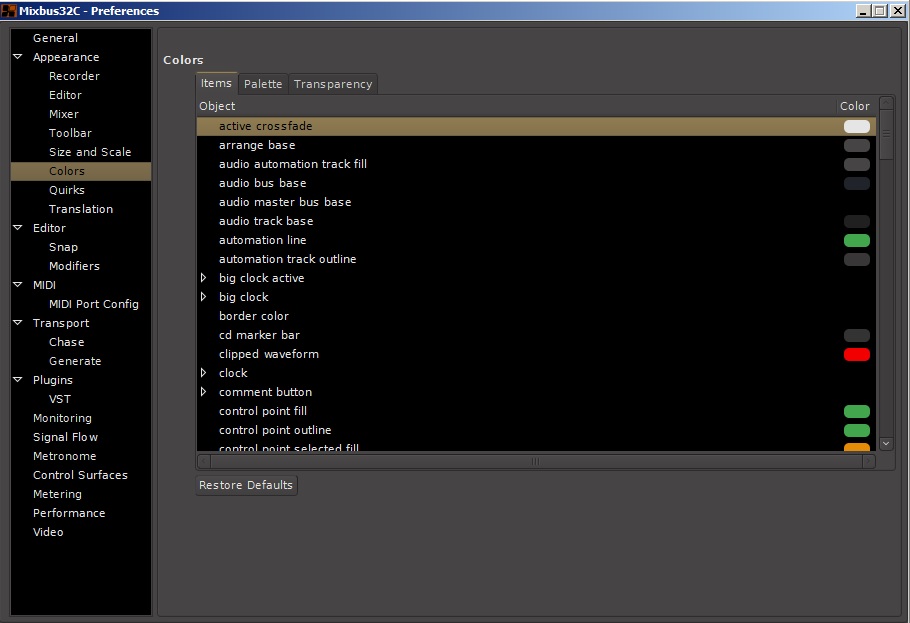
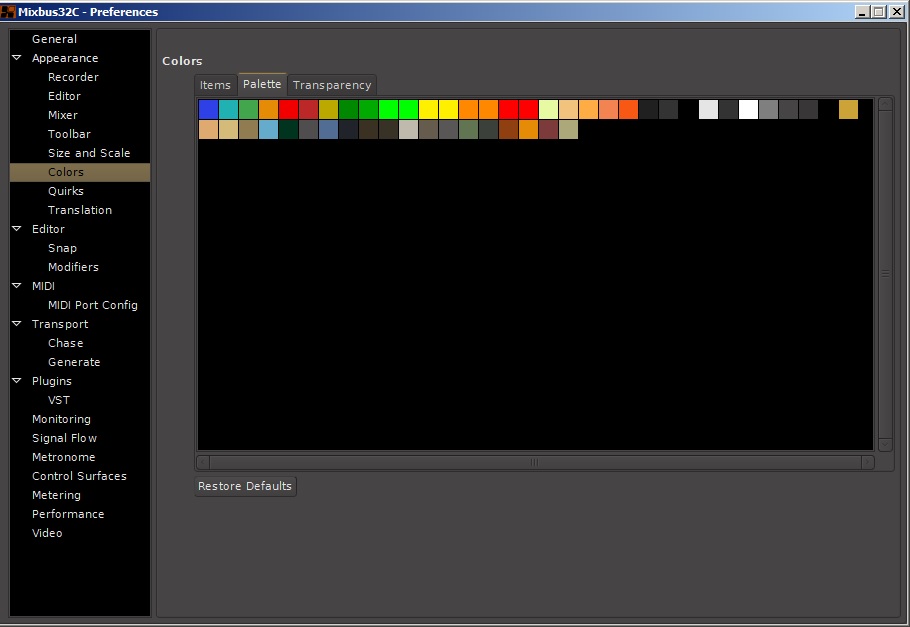
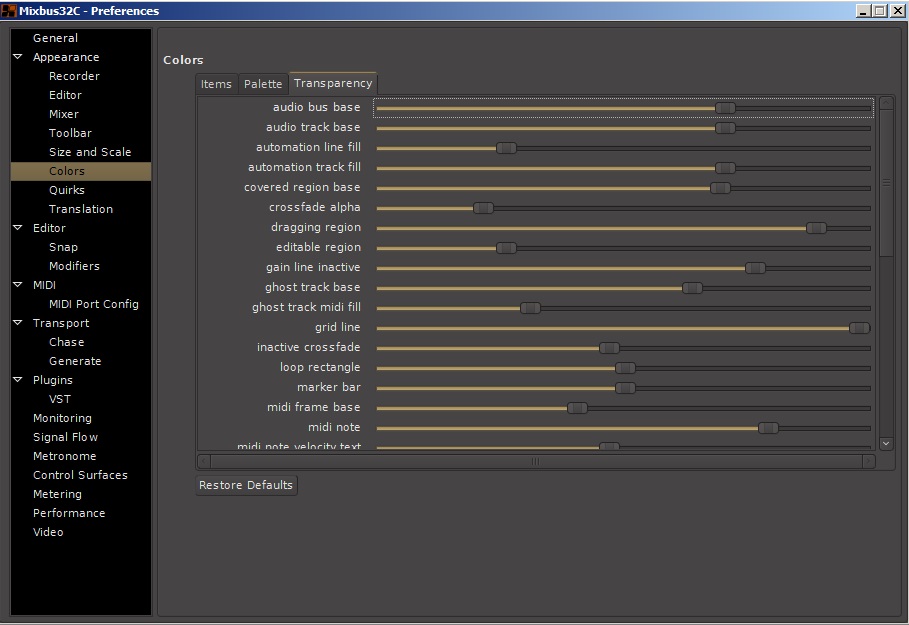
Colors
This window provides a way to customize every color used by Mixbus. There are three tabs.
Items
This tab lists each Object, alphabetically, and displays the color associated with that object. Click on the color to modify.
Palette
This tab shows the color palette used by Mixbus, when selecting colors. You can click on each color to modify it, which will become part of the new available palette.
Transparency
This tab lists everything in Mixbus that can be rendered with Transparency. Each object has a slider to adjust the amount of transparency.
Quirks

Various Workarounds for Windowing Systems
Rules for closing, minimizing, maximizing, and stay-on-top can vary with each version of your OS and the preferences that you’ve set in your OS. You can adjust the options below to change how Mixbus’s windows and dialogs behave. These settings will only take effect after Mixbus is restarted.
Use visibility information provided by your Window Manager/Desktop
All floating windows are dialogs
Mark all floating windows to be type “Dialog” rather than using “Utility” for some. Requires restart of Mixbus. This can help if you find that some popup dialogs are appearing behind the main window, or otherwise not being managed correctly by your desktop.
Transient windows follow front window
Makes transient windows follow the front window when toggling between the editor and mixer. Requires restart of Mixbus.
Translation
![]()
Internationalization
Use Translations
This option allows Mixbus to accommodate multiple languages and conventions, such as a decimal point being “.” in some languages and “,” in others.
Editor
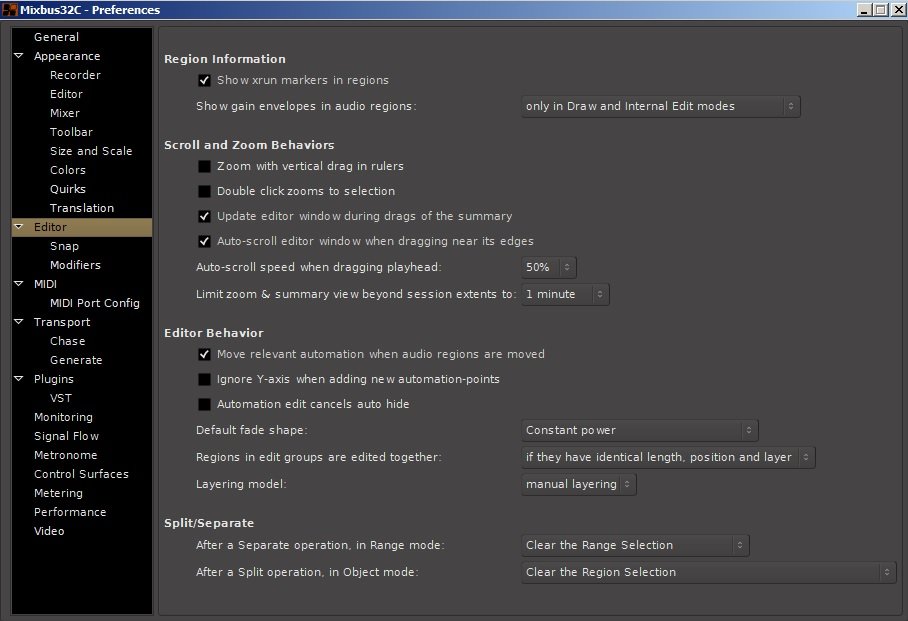
Region Information
Show xrun markers in regions
Selecting this box will display xrun warnings as markers in an affected region.
Show gain envelopes in audio regions
When creating gain envelopes in a region, this option allows you to specify whether “gain envelopes” in audio regions are shown only with the Draw or Edit tools, or in all modes. More information on the affected modes are found in the section Region Gain Automation.
Scroll and Zoom Behaviours
Zoom with vertical drag in rulers
When this option is enabled, you can click and drag vertically in the ruler of the Editor to zoom in & out. Dragging up zooms out, dragging down zooms in.
Double click zooms to selection
Enabling this option allows you to quickly zoom to whatever regions you have selected by simply double-clicking on one of the selected regions.
Update editor window during drags of the summary
By default, when dragging the “summary” view, the editor will be updated live. If your system is unable to redraw the editor window quickly enough, you can disable this option.
Auto-scroll editor window when dragging near its edges
When enabled: if you drag a region close to the edge of the editor, it will begin scrolling to accommodate the move.
Auto-scroll speed when dragging playhead
This selector sets the scrolling speed when dragging the playhead:
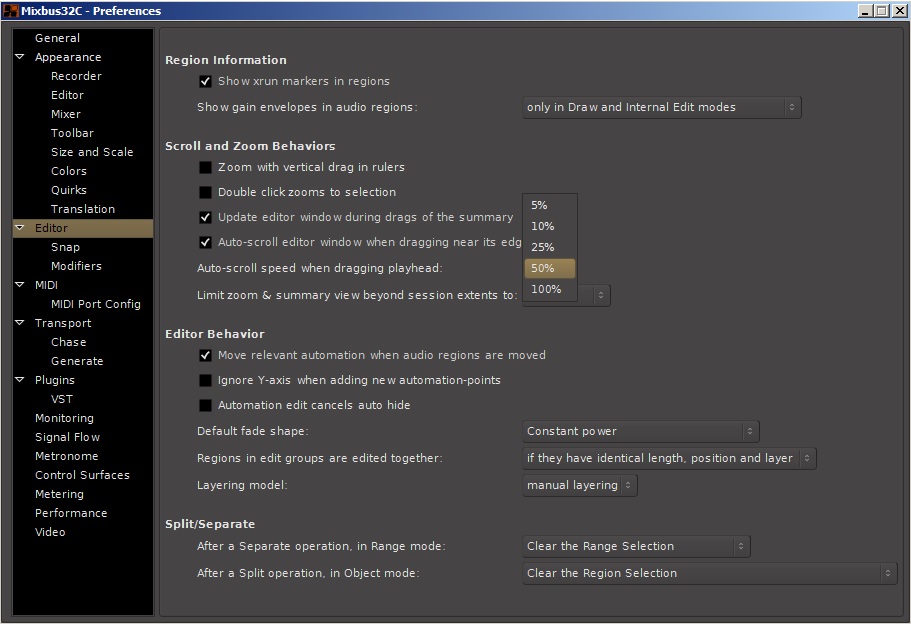
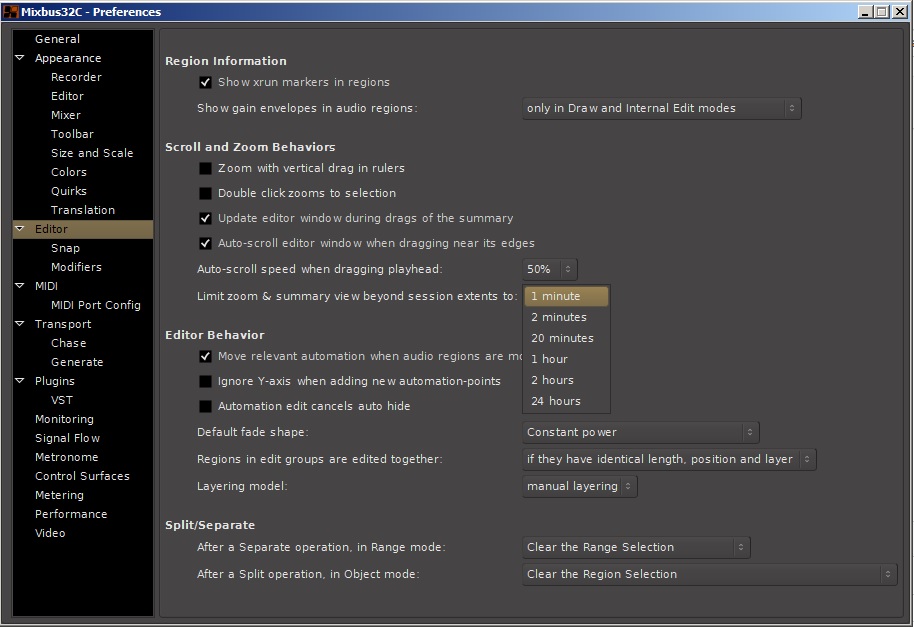
Limit zoom & summary view beyond session extends to
This selector sets limits on zoom & summary views to a predetermined time past the end of the current session length.
Editor Behavior
Move relevant automation when regions are moved
(default: ON) When you drag a region, this will also move any automation points that are within the region’s bounds. NOTE: this will overwrite any existing automation in the destination location.
Ignore Y-axis when adding new automation points
Automation edit cancels auto-hide
This checkbox refers to the “Show Automation Lanes on Touch” capability. There is a video “Show Automation on Touch” in the section Fader, Pan and Plug-in Automation explaining this feature.
When this box is checked, auto-hide after making a change to the automation is disabled. If you edit an automation parameter the automation lane will remain visible after the change rather than hiding itself.
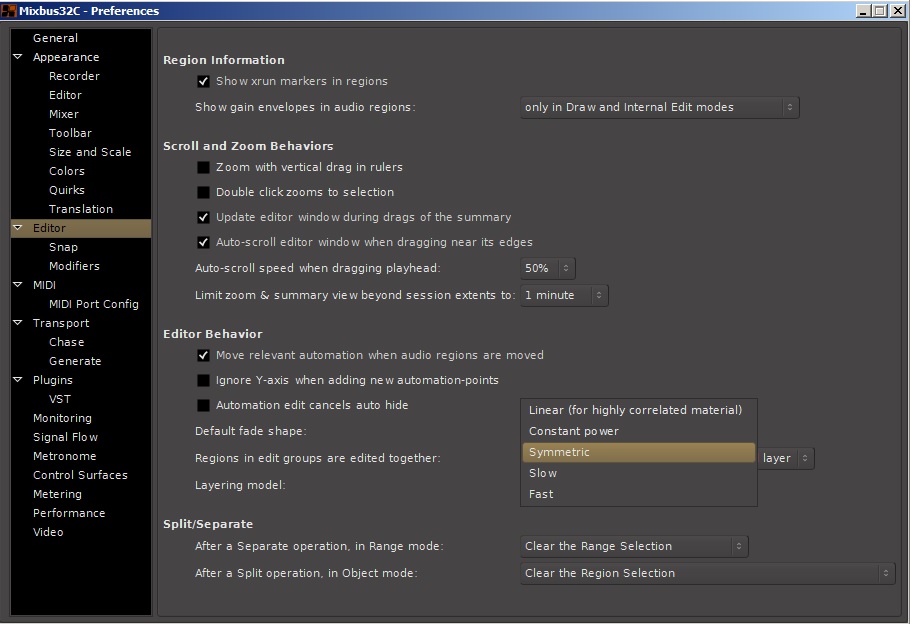
Default fade shape
This option allows you to specify the default shape for crossfades, between Linear, Constant power, Symmetric, Slow, or Fast.
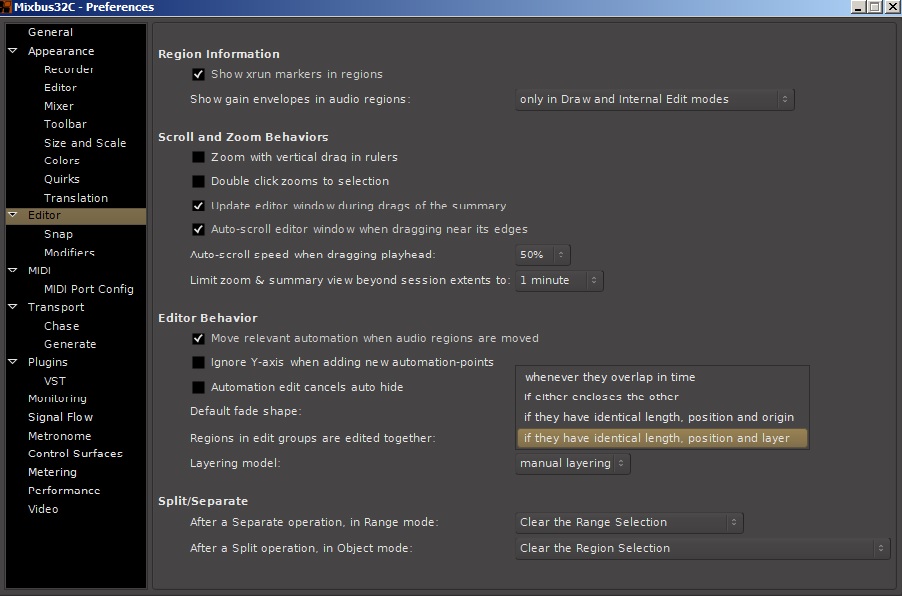
Regions in Edit Groups are edited together
This option allows you to specify the behavior of grouped regions in the editor window. The grouped regions can be edited together either only if they have identical length, position and origin (indicating that they are likely from the same source material and have been edited in sync), or whenever they overlap in time (if a region has any overlap with the currently-selected region, then it will move with the region).
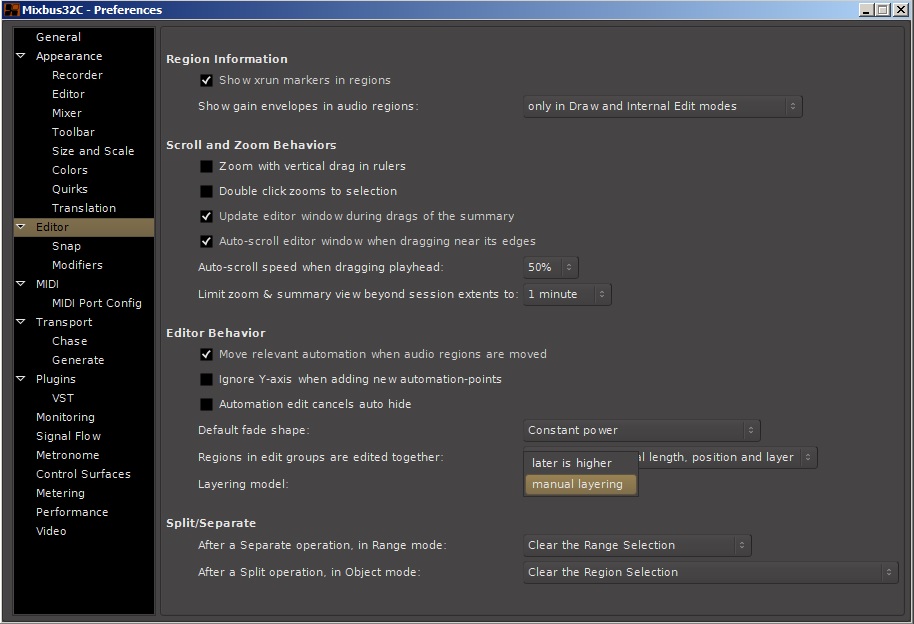
Layering Model
This option allows you to specify the layering behavior of regions. The default is Manual Layering, where the user is expected to manually control each region’s layer. Or, Later-is-higher defines region layering so that later regions will be assigned a higher layer.
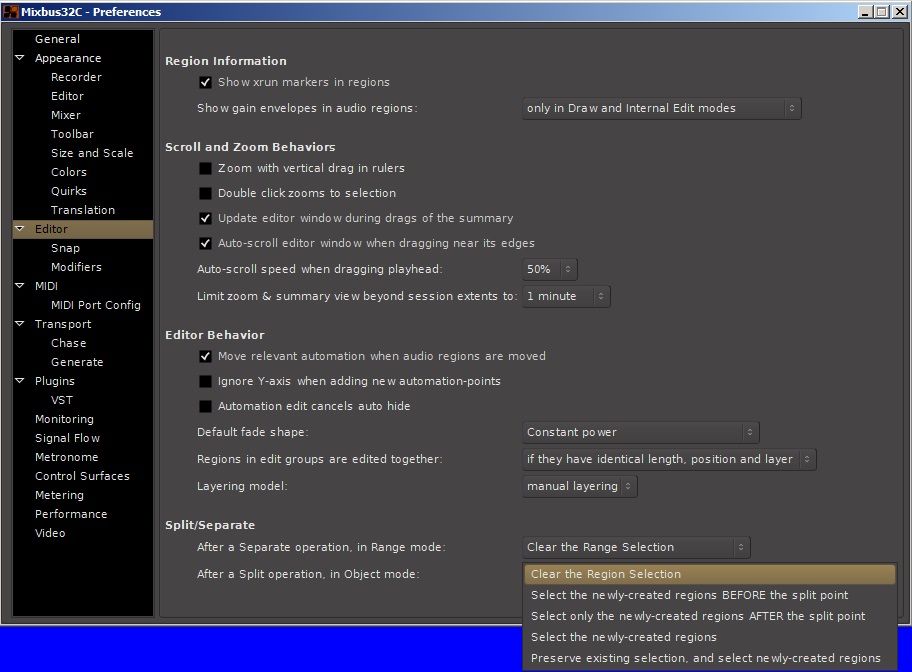
Split/Seperate
In Range Mode
Controls what happens to regions after split in Range Mode.
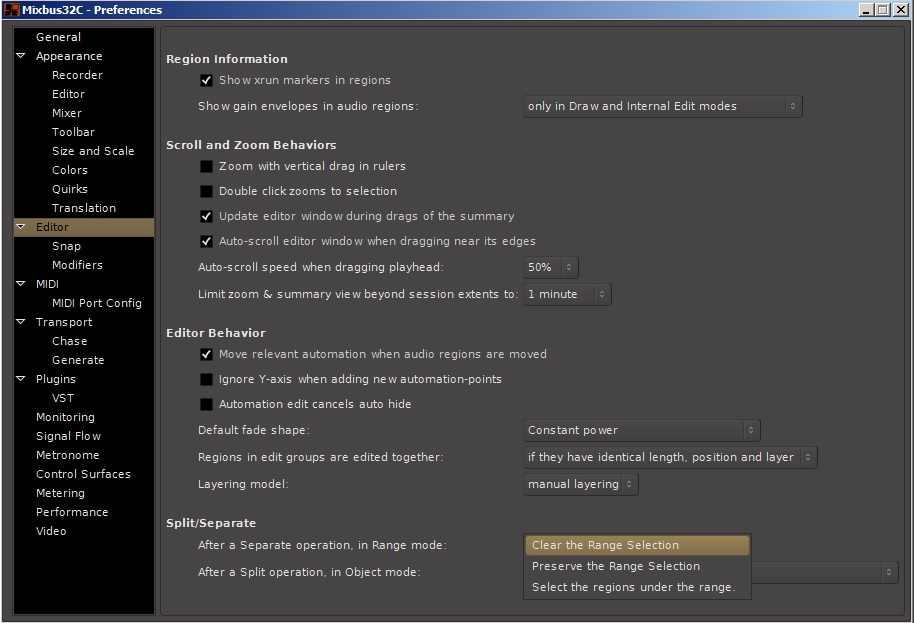
In Object Mode
Controls what happens to regions after split in Object Mode.
Snap:

General Snap Options:
Snap threshold (pixels)
Approximate grid/ruler granularity (pixels)
Show “snapped cursor”
Snap Rubberband selection to grid
In the editor, when doing a “rubber-band select” ( drawing a box to select multiple regions or control points ), the box edges will snap to the grid.
Grid Switches to alternate selection for Internal Edit tools
Rulers automatically change to follow the Grid mode selection
When “Snap” is enabled, snap to:
Markers
Region Sync Points
Region Starts
Region Ends
Grids
Modifiers
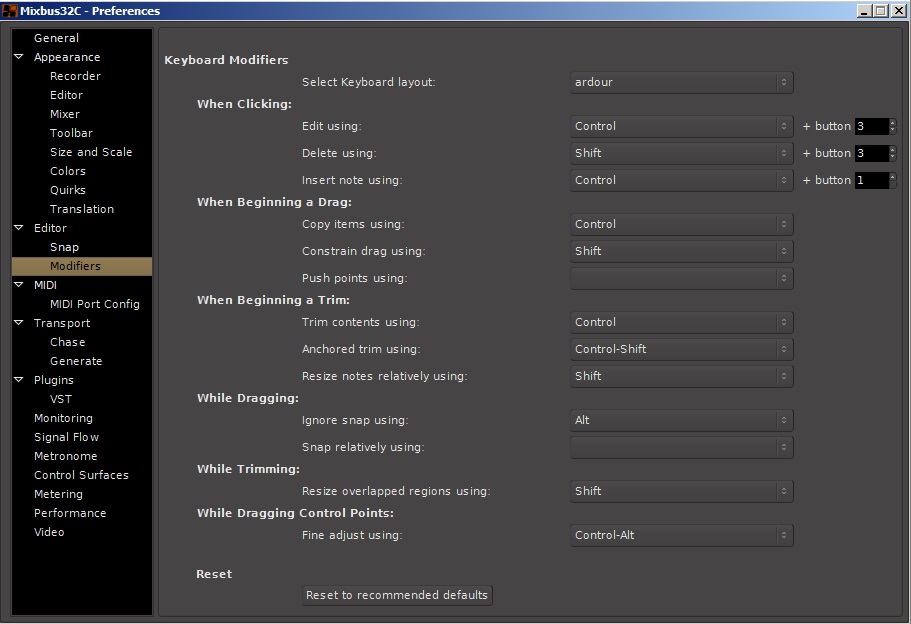
Keyboard Modifiers
This section allows you to change the keyboard modifiers Shift, Command, Control, Alt, as well as the lesser-used Windows keys, and combinations thereof, when using the mouse to click, drag, and trim in the Editor window. Using these keyboard modifiers you can adapt Mixbus to the editing workflow you prefer. Several parameters are offered:
Select Keyboard Layout
Currently Mixbus provides a single set of predefined keyboard shortcuts. If we later provide additional keybindings, they will appear here.
When Clicking
You can change which modifier(s) activate Edit, Delete, and Insert Note.
When Beginning a Drag
You can change which modifier(s) activate Copy items, Constrain drag, and Push points.
When Beginning a Trim
You can change which modifier(s) activate Trim contents, Anchored trim, and Resize notes relatively.
While Dragging
You can change which modifier(s) activate Ignore snap and Snap relatively.
While Trimming
You can change which modifier(s) activate Resize overlapped regions
While Dragging Control Points
You can change which modifier(s) activate Fine adjust.
Reset
This button will reset all modifiers above to their recommended defaults.
MIDI
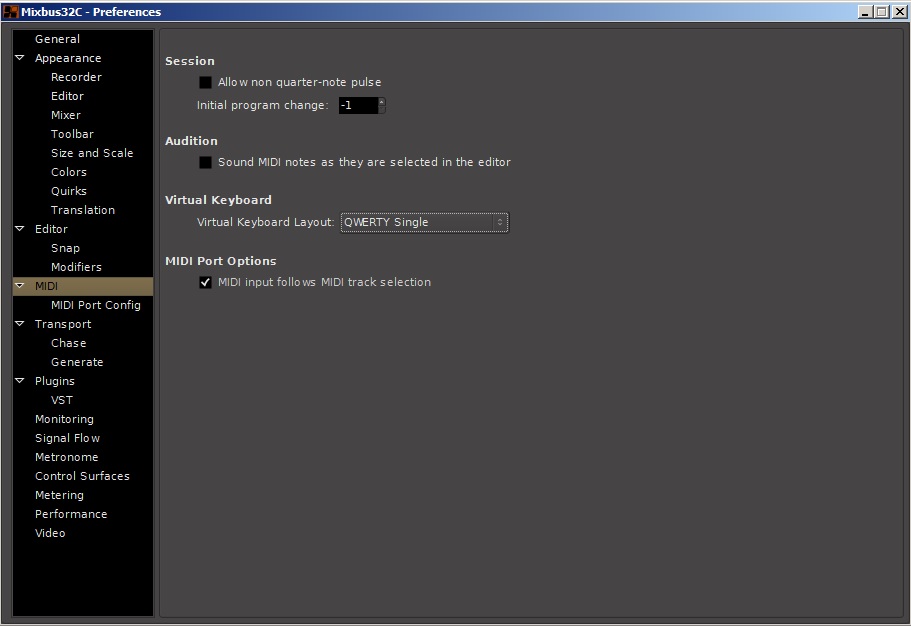
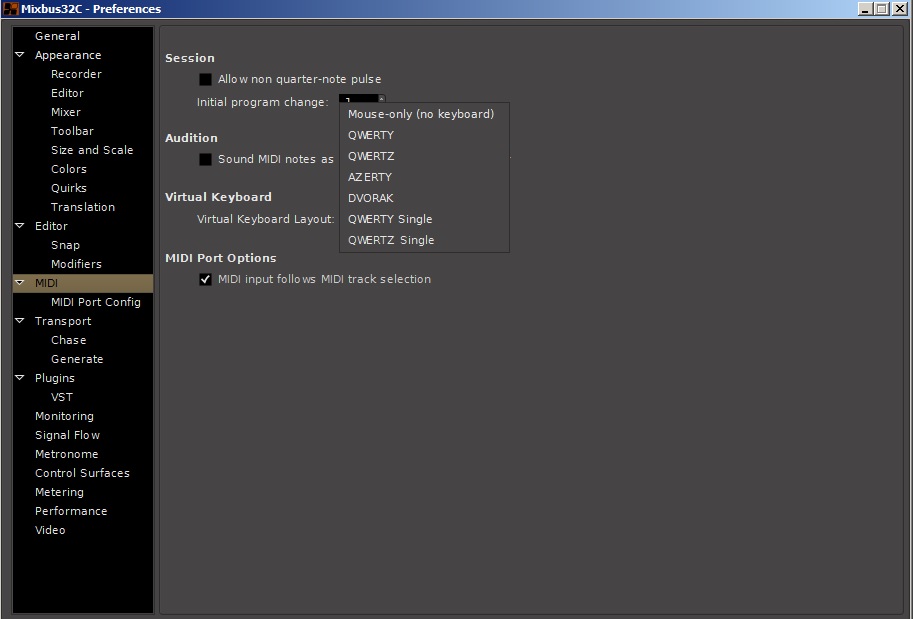
Session
Allow non quarter-note pulse
Initial program change
Mixbus will send this MIDI program-change to the MMC port, when a new session is opened.
Audition
Sound MIDI notes as they are selected in the editor
When this option is enabled, clicking on a MIDI note in the editor will cause it to play.
Virtual Keyboard
The Virtual Keyboard is covered in section Virtual Midi Keyboard.
This selector provides different mappings of the virtual keyboard to your computer keyboard, which may be any of several popular computer keyboard layouts.
MIDI port options
MIDI input follows MIDI track selection
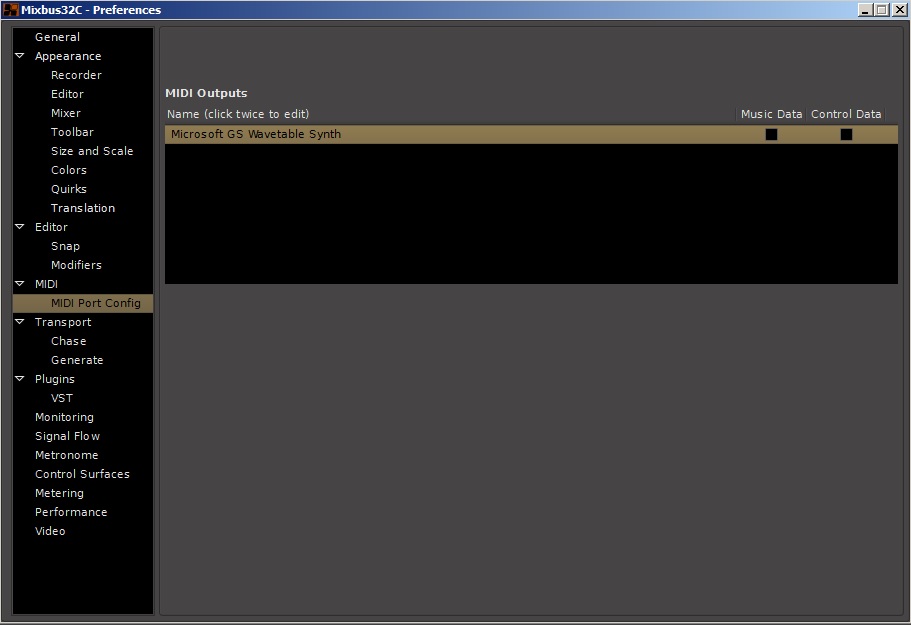
MIDI port config
The checkboxes configure the MIDI port to carry Music data, Control data, or both.
Transport
![]()
General
Prompt for new marker names
Stop at the end of the session
When enabled if Mixbus is not recording, it will stop the transport when it reaches the current session end marker. When disabled Mixbus will continue to roll past the session end marker at all times.
Keep record-enable engaged on stop
To prevent accidental overwriting this is off by default.
Reset default speed on stop
Disable per-track record disarm while rolling
When enabled this will prevent you from accidentally stopping specific tracks recording during a take.
12dB gain reduction during fast-forward and fast-rewind
This will prevent the unpleasant increase in perceived volume that occurs when fast forwarding or rewinding through certain kinds of audio.
Preroll
There are several options here including Bars (1, 2, or 4), Zero (no preroll at all), and Seconds (0.1 to 2.0)
![]()
Looping
Play loop is a transport mode
When enabled the loop button does not start playback but forces playback to always play the loop. When disabled the loop button starts playing the loop, but stop then cancels loop playback.
Loop fades
This selector controls audio fading at the boundaries of a looping region.
![]()
Dropout (xrun) Handling
Stop recording when an xrun occurs
A buffer xrun will produce noise. Checking this option prevents this noise from accidentally being recorded.
Create markers where xruns occur
When enabled, this option creates new markers on the timeline whenever an xrun occurs.
Reset xrun counter when starting to record
Checking this box will make the xrun counter in the recording window reset every time a new record is started.
Plugins
Silence plugins when the transport is stopped.
This checkbox will stop processing and silence the output of plugins when the transport is stopped. This might apply to any plugin which creates sound, such as virtual instruments, or to things like reverb and delay. This can save battery life, and is OFF by default.
Chase
![]()
MIDI Machine Control (MMC)
This checkbox and selector sets whether Mixbus responds to MMC commands, and allows you to assign device ID to Mixbus.
Show Transport Masters Window
Clicking on the button will open the Transport Masters window. Properties and use of the Transport Masters window can be found in the section Transport Masters
![]()
Generate
This window controls Mixbus’ output of timecode (both LTC and MTC) , MIDI Machine Control commands, and the MIDI beat clock.
![]()
Linear Timecode (LTC) Generator
Enable LTC generator
The checkbox enables the LTC generator. When enabled, Mixbus will send LTC from the LTC port. The LTC generator can be routed to an audio track using the routing tool.
Send LTC while stopped
When enabled Mixbus will continue to send LTC information even when the transport (playhead) is stopped.
LTC generator level [dbfs]
The slider allows setting the level of the peak volume of the generated LTC signal in dBFS. A good value is 0 dBu^= -18 dBFS in an EBU calibrated system.
LTC Output Port
This selector will set a default output on the audio interface for the LTC signal, connected to this output when the session is opened. In the picture this session uses a 64-wide Dante interface, the LTC may be sent by default to any of these outputs.
![]()
MIDI Time Code (MTC) Generator
The checkbox enables the MIDI time code generator. A maximum limit on varispeed may be set.
MIDI Machine Control (MMC)
The checkbox enables Mixbus to send MMC commands. The MMC device ID is set here.
MIDI Beat Clock (Mclk) Generator
The checkbox enables the MIDI beat clock generator.
Plugins
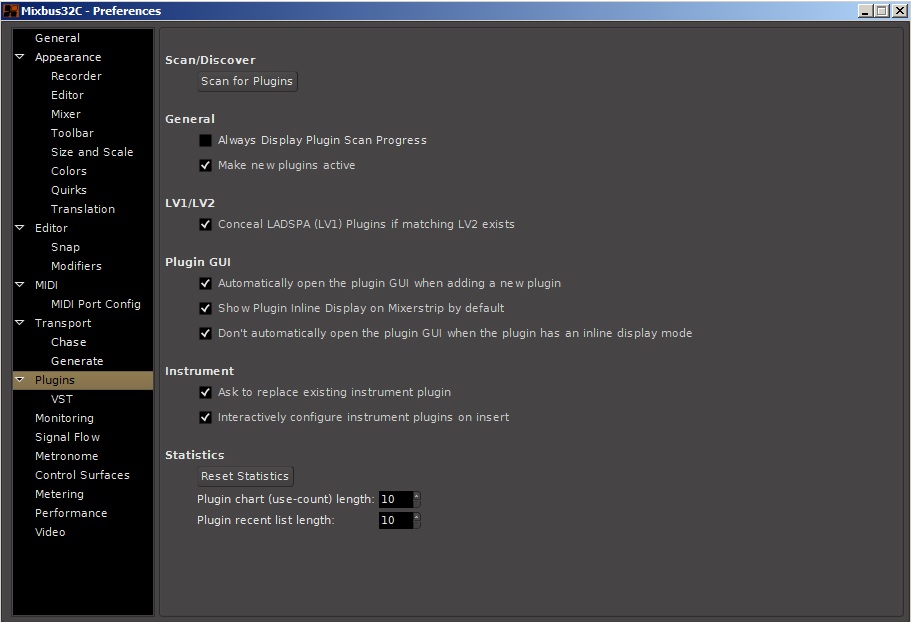
Scan/Discover
The Scan for Plugins button initiates a new scan for any new plugins you may have installed along the paths listed in the VST path box. A pop up dialog window shows the progress of the scan operation.
General
Always Display Plugin Scan Progress
When enabled, Mixbus will display a dialog window showing each plugin being scanned. This is ON by default.
Make new plugins active
By default, Mixbus will immediately enable a plugin when it is added. If you disable this option, then newly-added plugins will be “disabled” by default.
LV1/LV2
This option, when enabled, will conceal LADSPA (LV1) plugins if a corresponding LV2 plugin is installed. This can ensure you are always using a more up to date plugin.
Plugin GUI
Automatically open the plugin GUI when adding a new plugin
When a new plugin is added to the strip, the plugin’s UI will be shown. This is ON by default. Note that this only applies when a single plugin is added. If you add multiple plugins at once, the GUI will not appear automatically.
Show Plugin Inline Display on Mixerstrip by default
When a plugin with an “inline display” is added, this option will cause the inline display to be shown automatically
Don’t automatically open the plugin GUI when the plugin has an inline display mode
When a plugin with an “inline display” is added, this option will cause the inline display to be shown instead of the plugins main UI.
Instrument
Ask to replace existing instrument plugin
When an instrument is added to a track that already has an instrument, Mixbus will prompt you to replace the existing instrument. This is ON by default.
Interactively configure instrument plugins on insert
When a plugin with multi-outputs is added to a track, this option will cause Mixbus to prompt the user for the desired channel configuration: mono, stereo, or multichannel.
Statistics
The selectors allow setting of the maximum lengths of the plugin usage-count chart and the recently used chart.
The reset button resets the plugin usage statistics.
VST

VST
Scan for [new] VST Plugins on Application Start
New VST plugins are searched, tested and added to the cache index on application start. When disabled new plugins will only be available after triggering a ‘Scan’ manually.
Verbose Plugin Scan
Scan Timeout
If a plugin exceeds this time when scanning, this might indicate a bug in the plugin. In this case the scan will be aborted and the plugin will be put on the “blacklist”. Plugins sometimes take a long time to scan, because they are checking online for licensing information or updates. Adjust this value to accommodate your plugin’s needs.
VST2.x
The buttons allow you to clear the cache or the blacklist.
VST2 Cache
Clicking this button will clear the VST2 “cache” which is a list of VST2 plug-ins that have been scanned. Mixbus will only load plug-ins that have been scanned and are in the cache. So clicking this button will disable VST2 plug-ins in Mixbus until paths have been scanned.
VST2 Blacklist
When a plug-in crashes on scanning, it is placed in the “blacklist” and will not be scanned in the future. Click this button to clear all blacklisted plug-ins so they can be scanned.
VST2 Path
The heading and some details below will vary depending on the platform on which you are running Mixbus (MAC, Linux, Windows PC).
The VST2 Path is a list of directories that Mixbus will use to scan for VST2 plug-ins. This path may not be directly edited by the user, but can be cleared, added to, and set to defaults with the buttons provided.
Clicking this button launches a dialog box that allows the user to specify which folders contain VST2 plug-ins.
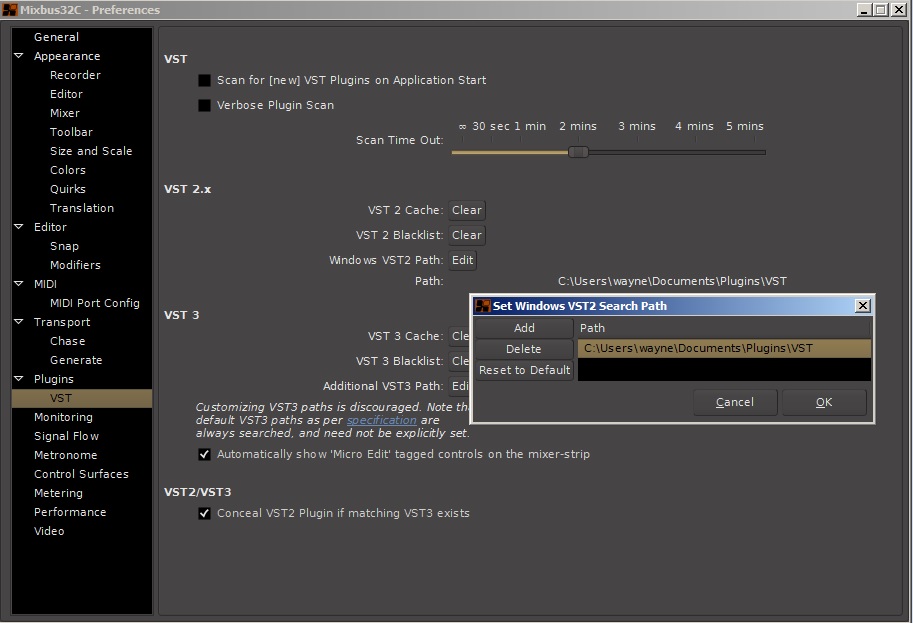
Add opens a dialog box that allows you to add new folders. Highlight the desired folder and click “OK” to add it to the VST2 path. Pressing Delete (this button will be lit only if you have selected a path) will remove the selected path from the VST scan. Restore to Default will set the VST path to those folders that are defined as VST2 paths in your computer’s operating system. In Windows, this includes paths set in the registry as well as the environment variable VST_PATH.
Path: shows the current path through your computer system where Mixbus will look for VST2 plugins.
VST3
The buttons allow you to clear the cache or the blacklist.
VST3 Cache
Clicking this button will clear the VST3 “cache” which is a list of VST3 plug-ins that have been scanned. Mixbus will only load plug-ins that have been scanned and are in the cache. So clicking this button will disable VST3 plug-ins in Mixbus until paths have been scanned.
VST3 Blacklist
When a plug-in crashes on scanning, it is placed in the “blacklist” and will not be scanned in the future. Click this button to clear all blacklisted plug-ins so they can be scanned.
Additional VST3 Path
This button allows you to specify additional paths to search for VST3 plugins. Note the warning message.
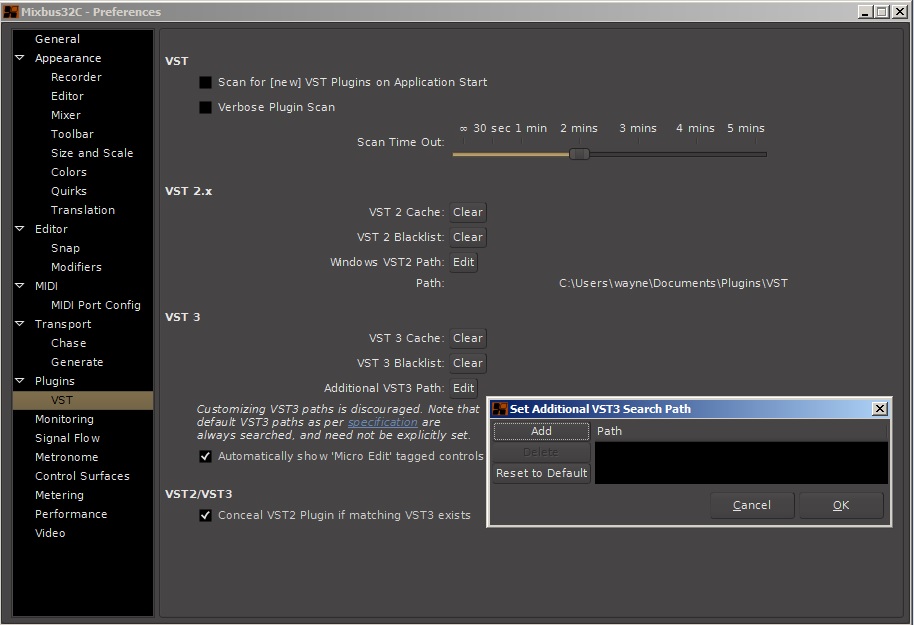
Automatically Show “Micro Edit” Tagged Controls on the Mixer Strip
Checking this box will show plugin controls with “Micro Edit” capability directly on the mixer strip.
VST2/VST3
Checking this box will conceal LV2 plugins if a corresponding LV3 plugin is installed. This can ensure you are always using a more up to date plugin.
Monitoring
Monitoring
Recording monitoring handled by:
This selector sets whether monitoring is to be done by Mixbus, or by external hardware:
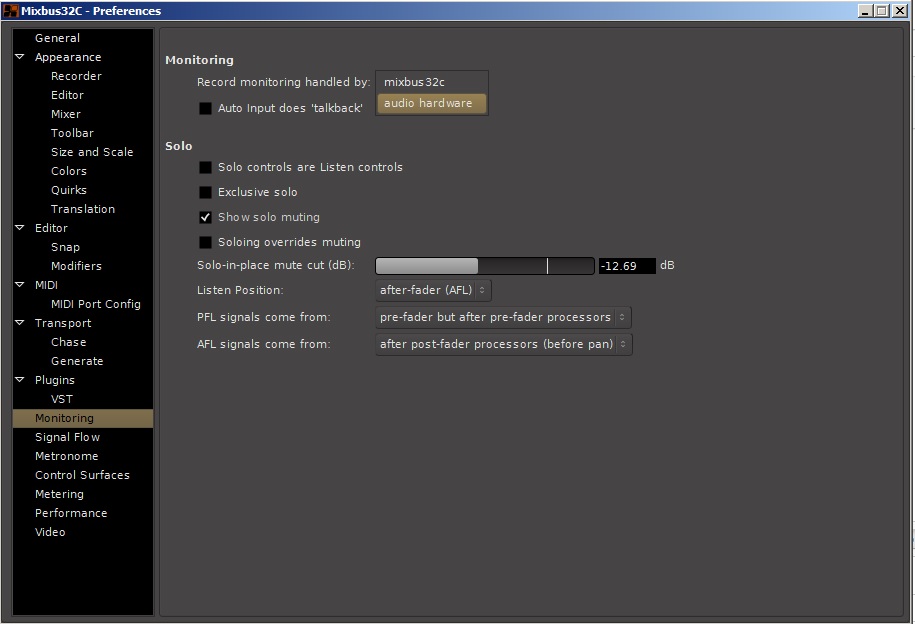
Auto Input Does Talkback
This checkbox enables “Auto Input does Talkback”. If “Auto Input does Talkback” mode is enabled, then Mixbus will monitor the input of all tracks, even unarmed ones, during stop. In a multi-room setup, this feature allows easier setup of your instrument or communication among members of a band, because all the live mics are passed through to the master bus output so everyone can hear themselves through the monitoring system (which might consist of foldback buses). This option only takes effect when Auto Input is enabled in the Transport menu.
See Monitoring for more details.
Solo
Solo controls are Listen controls
When this is enabled, Solos will appear on the “monitor” output, but they do not mute the master bus output. This allows the engineer to listen to a solo, without affecting the master bus output in those cases where the master bus is being recorded “live” and should not be interrupted.
Exclusive Solo
When this option is enabled, only one track or bus can be in solo at any given moment. If another track or bus is selected, then it will become the only track or bus that is in solo mode.
Show solo muting
When this option is enabled, soloing one track or bus causes a yellow outline to be drawn around all the other tracks or busses which are muted by the solo selection. Every track or bus that is not solo’ed will be effected in this way, to remind you why the track is not audible.
Soloing overrides muting
When this option is enabled, pressing the solo button will allow the audio on that track or bus to be heard, even if the mute button is also pressed. When this option is not enabled, then the mute button still continues to function, even if the track is solo’ed.
Solo-in-place mute cut (dB):
Listen Position
The selector chooses between pre-fader and after-fader listening.
PFL signals come from
The selector chooses pre-fader soloing to come from before or after plugin processors. Default is AFTER processors.
AFL signals come from
The selector chooses after-fader soloing to come from before or after post fader plugin processors, but always before panning.
Signal Flow
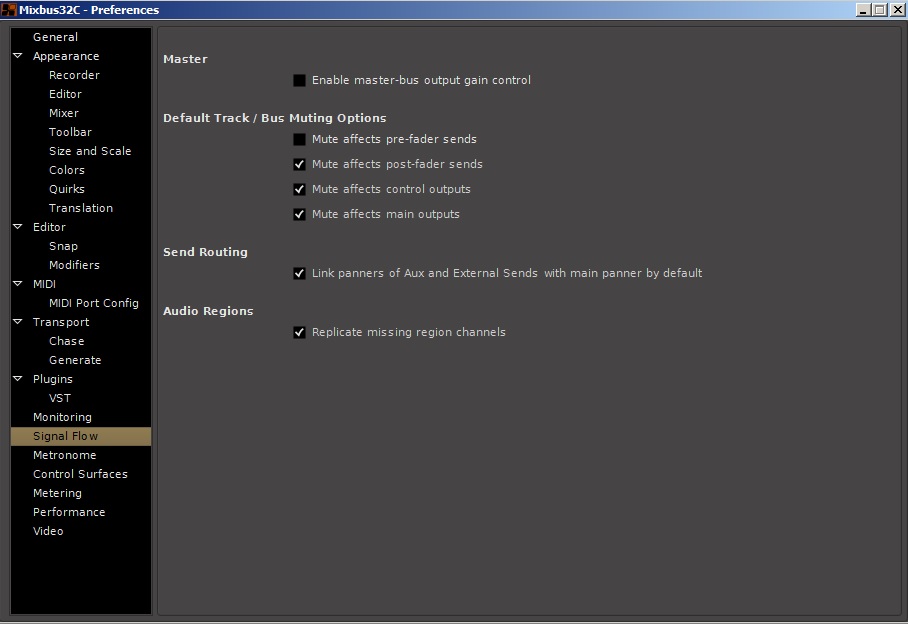
Master
Enable Master Bus output gain control
Selecting this checkbox will add an adjustable post-fader gain trim to the master bus output. Note this affects the Master bus output, NOT the master bus monitoring path.
Default Track/Bus Muting Options
These checkboxes control what is muted when Track or Bus mute button is engaged.
Mute Affects Pre-Fader Sends
Mute Affects Post-Fader Sends
Mute Affects Control Outputs
Mute Affects Main Outputs
Send Routing
Link Panners of Aux and External Sends with main Panner by default
This checkbox links the panners of channel strip Aux Sends and External sends to the main panner on the strip.
For more information on Aux sends and how their panning works, see the section DAW Style Mixing Buses for more details.
For more information on External sends, see the section Redirects: Plug-ins, Sends & Inserts.
Audio Regions
Replicate Missing Region Channels
If you send a mono region on a stereo channel, this option will cause the mono signal to appear on both left and right channels. If this option is disabled, then the mono region will only be heard from the left side of the channel.
Metronome
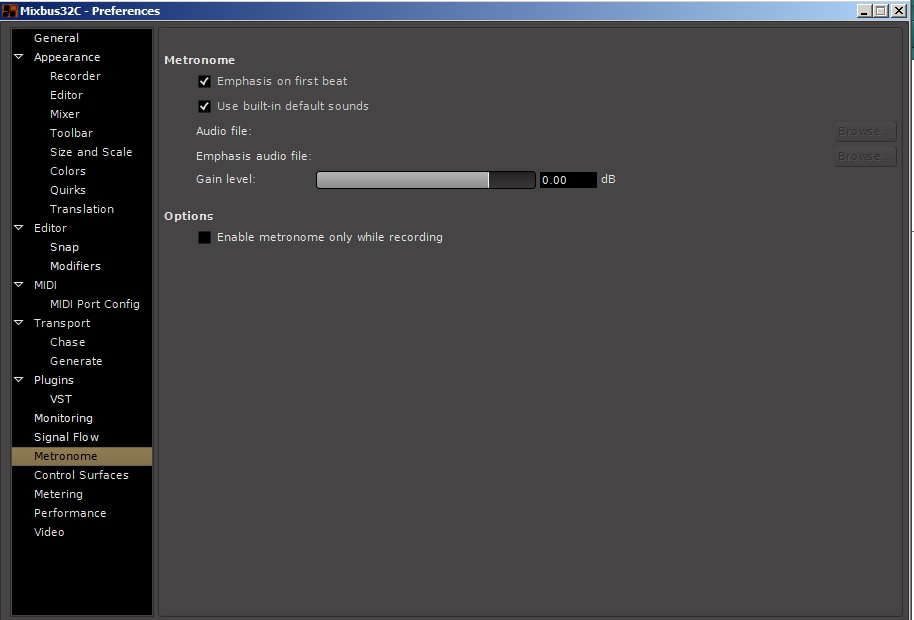
Metronome
Emphasis on first beat
When enabled, this option uses a different tone, with a higher pitch, on the first beat of each measure to make it easier to hear where each bar begins. When disabled, the same tone is used on each beat.
Use built-in default sounds
Enables a simple option to automatically generate a useable click track with the metronome using built-in default sounds. If you prefer to use your own sounds, de-select this option and load your sounds below.
Audio File
If the default sounds are disabled, browse to define the sound file for the “click” used by the metronome.
Emphasis audio file
If the default sounds are disabled, browse to define the sound file for the “emphasis click” used by the metronome. The emphasis click occurs on the first beat of each measure.
Gain level
Adjustable from – infinity to +6 dB
Options
Enable metronome only while recording
Checking this box will enable the metronome only while recording.
Control Surfaces
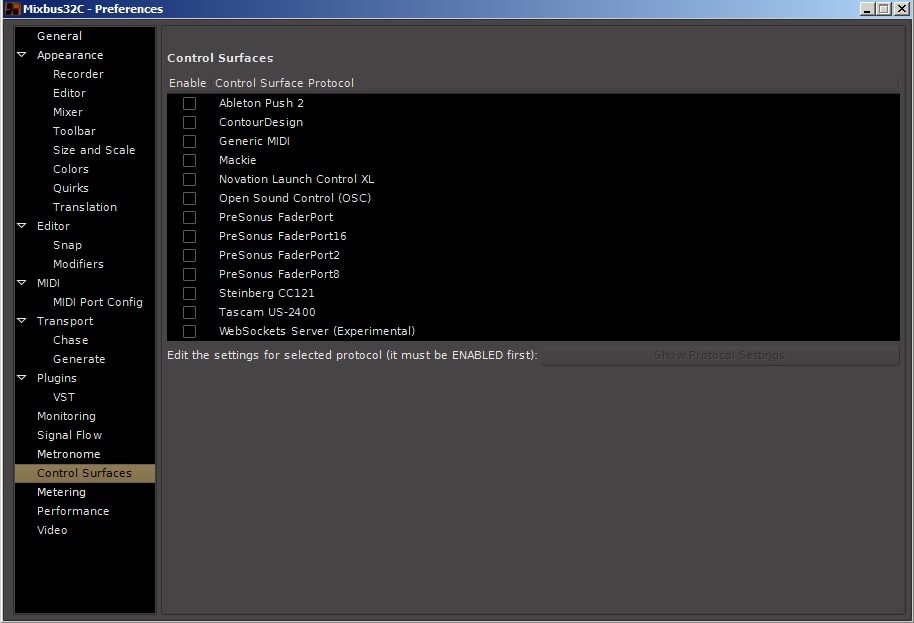
Control Surfaces
Enable Control Surface Protocol
This option allows you to specify the Control Surface Protocol you’d like to use. Some options, like Generic MIDI, OSC, and Mackie are common standards that may be used by a variety of control surfaces. Others, like Ableton Push 2, PreSonus FaderPort, and Stenberg CC121 are Mixbus’ implementation of specific controllers available. If you’d like to use one of these products, enable it here, and tweak the various options below.
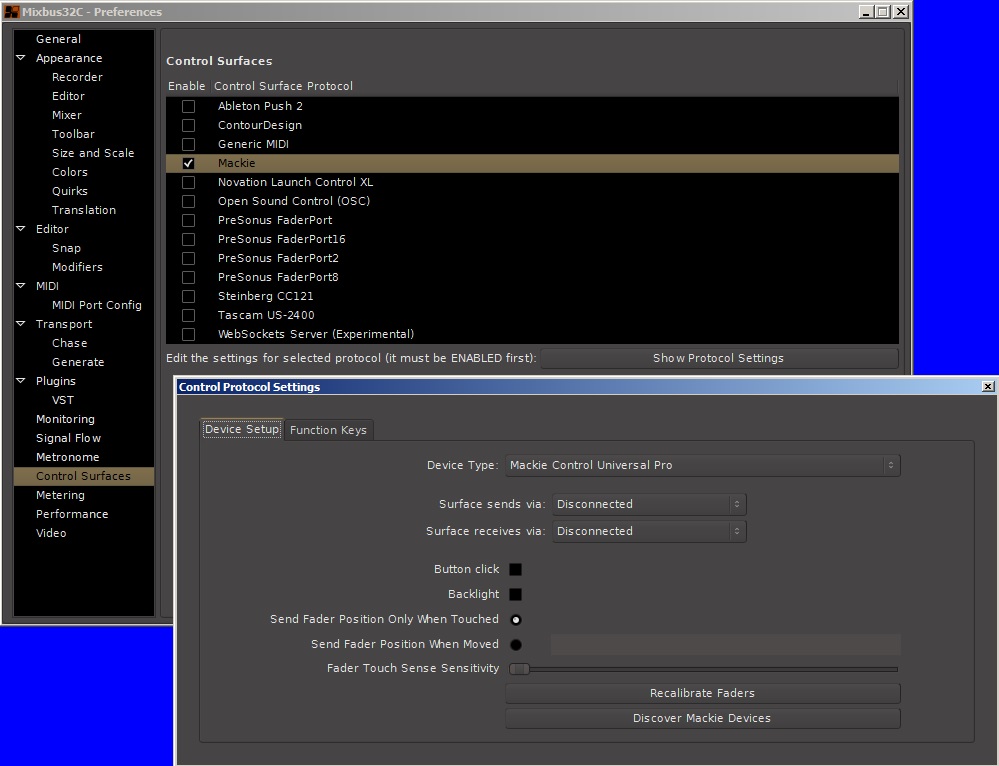
Edit the settings for selected protocol (it must be ENABLED first)
Once you have enabled a protocol above, you can edit the settings for that protocol by clicking the button, which will launch a new dialog box.
Metering
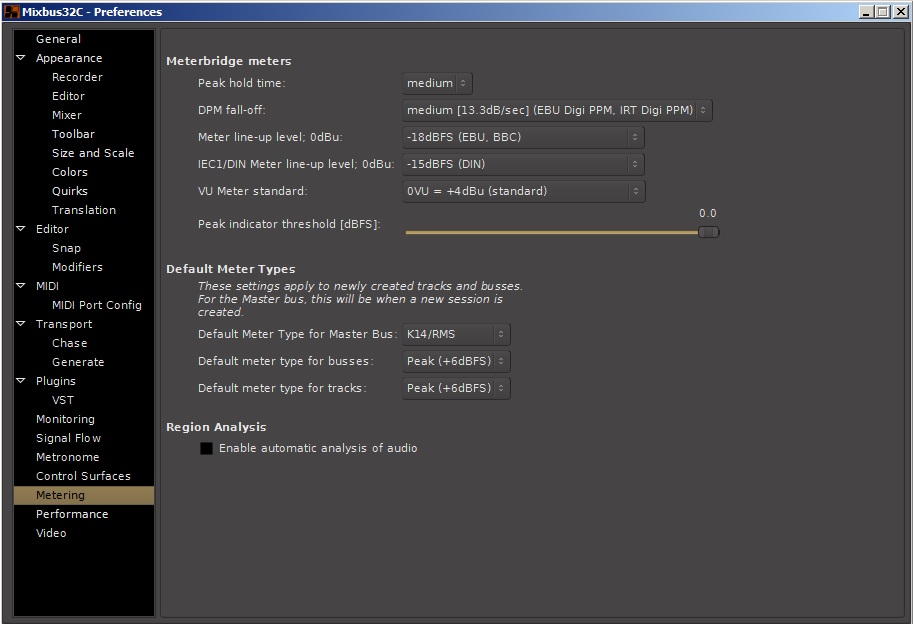
Meterbridge meters ( NOTE: these options only apply to the meters in the Meterbridge window )
Peak Hold Time
The hold time for the peak-hold indicators. Ranges from off to short, medium, and long.
DPM fall-off
The decay rate of audio meters, ranging from Off (instant decay) to Slowest (6.6dB/sec decay rate).
Meter line-up level; 0dBu
This selector configures the reference level for all meters configured as IEC1/Nordic, IEC2/PPM and VU meters.
IEC1/DIN Meter line-up level; 0dBu
This selector sets the reference level specifically for meters configured to IEC1/DIN standard.
VU Meter standard
This selector sets the 0 VU reference level for VU meters. Standard for recording is 0VU = +4 dBu. Broadcast applications typically use 0VU = +8 dBu.
Peak Indicator Threshhold (dBFS)
This slider allows you to set the threshold of the peak indicators.
Default Meter Types
These selectors allow you to separately specify what kind of metering algorithm is used for tracks, buses and the master bus. Several options are available for each.
Default Meter Type for Master Bus
Default Meter Type for Busses
Default Meter Type for Tracks
Region Analysis
Enable automatic analysis of audio
If this is enabled, Mixbus will always analyze audio (to find transients) when files are imported to a session. This might cause imports to take longer, but it saves time when you try to “skip to next transient”.
Performance
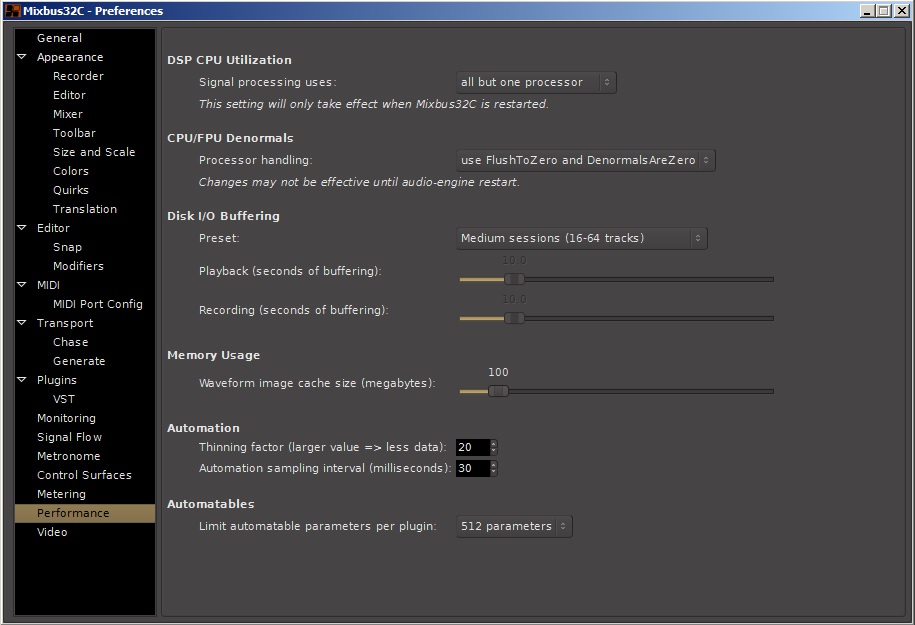
DSP CPU Utilization
Signal processing uses
This option defines how many “threads” Mixbus will create to process audio signals. If you use a lot of tracks and plug-ins, then Mixbus will require significant CPU resources. This setting allows Mixbus to use multiple processors in parallel, thereby taking advantage of modern computers with 2, 4, or more CPU cores.
- all but one processor is the default setting. This setting reserves one processor so your computer does not feel sluggish when Mixbus is heavily loading your CPU.
- all processors might allow Mixbus to run more tracks/plug-ins with the risk of causing other desktop applications feeling sluggish.
CPU/FPU Denormals
Denormals relate to 32 bit floating point processing used by Mixbus. Some plugins, when used in Mixbus, generate “denormals” which is an invalid processor state that causes random high CPU spikes. If you believe a plugin is generating denormals, you can enable this checkbox for the track, and see if it helps the problem. For more on denormals click here: http://en.wikipedia.org/wiki/Denormal_number
Processor Handling
This option attempts to use internal CPU settings to avoid denormals. In a few cases, plugins that cause CPU spikes can be improved by enabling this option, or one of the other “denormal” options.
Disk I/O Buffering
A smaller buffer allows mixbus to load sessions and locate faster. If you receive a message like “your disk was not able to keep up with Mixbus”, then you should increase the buffer size. If you have fewer tracks (8-16), and/or a very fast disk (SSD), then you can use very low buffer sizes, and Mixbus will feel extremely responsive. Generally speaking, Mac requires larger buffers than Windows and Linux.
Preset
There are four preset options: small sessions, medium sessions, large sessions, and custom, which allows you to set your own buffer times using the sliders for playback and recording.
Playback (seconds of buffering)
Increase this value if Mixbus reports “your disk was not able to keep up with playback”. Increasing the buffer might cause a slight delay when Mixbus locates, because it is buffering more audio before playback can start.
Recording (seconds of buffering)
Increase this value if Mixbus reports “your disk was not able to keep up with recording”.
Memory Usage
Waveform image cache size (megabytes)
This slider allows you to set the size, in Megabytes, of the waveform image cache. For large projects with a lot of tracks, setting this higher may improve screen rendering times to improve performance. For smaller projects, or for systems with smaller amounts of RAM, the cache size can be reduced.
Automation
Thinning factor
This option removes data points within the automation draw points. Excessive draw data may reduce system responsiveness with little to no audio benefit. Larger numbers means more thinning, and therefore fewer draw points but more responsiveness.
Automation sampling interval
This option determines the rate (in milliseconds) at which automation points are acquired. If the density of automation points is too high system responsiveness may be reduced.
Automatables
Limit automatable parameters per plugin
This selector sets upper limit on the number of parameters that are automated in plugins.
Video
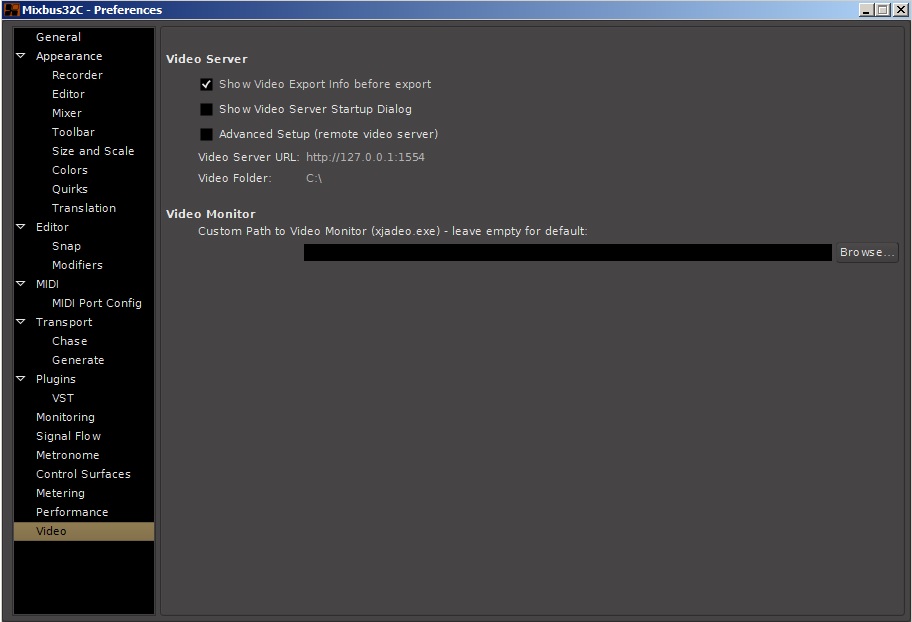
Video Server
Show Video Export info before export
When enabled, an information window with details is displayed before video export dialog.
Show Video Server Startup Dialog
When enabled, the video server is never launched automatically without confirmation.
Advanced Setup (remote video server)
When enabled you can specify a custom video server URL and docroot.
Video Monitor
Custom Path to Video Monitor (xjadeo)
Leave empty for default.
Post your comment on this topic.