
Record Window
New in v7, the Record window allows you to record multitrack performances with ease.
Access the Record page by clicking “Rec” in the top-right corner, or choosing it from the Window Menu.
Tracks Section
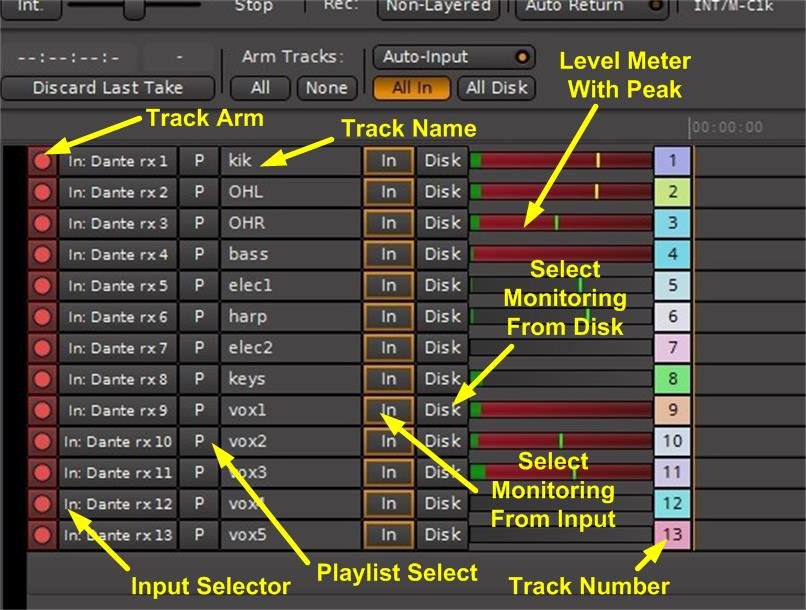
Each track has the following indicators and controls:
Track Arm Button
These buttons arm the track for recording. Recording on this track will not begin until Record mode is invoked using the Transport buttons above, or by punching in.
Input Selector
Clicking this button provides a way to disconnect or reassign the input to this track. Either a left-click or right-click can be used. Left-click provides a simple list of sources:
Right-click opens the Router page for this track’s input:
Playlist Select
This button allows selection or creation of a specific playlist to record to for this track. Think of a playlist as a separate piece of tape, or a 3rd dimension (into the screen) with different versions of your track or section of a track. More about Playlists can be found in the section titled Playlists.
Clicking on this button brings up a menu with several options:
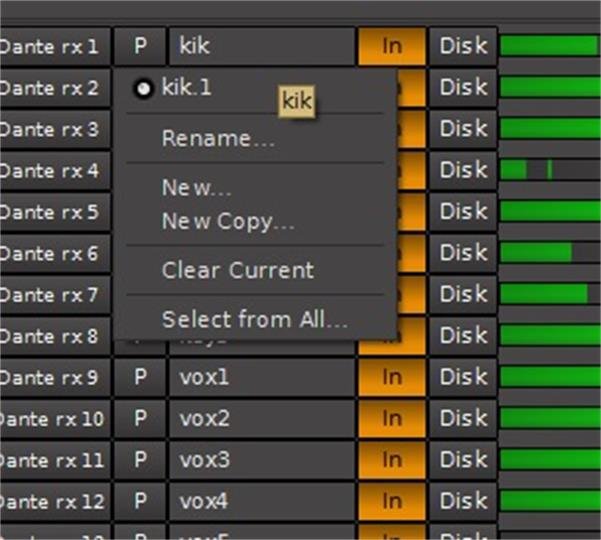
Here, the first playlist for the kick drum has been named kik.1 by default. The menu allows you to rename it, or create a new playlist, either an empty one or one which is a copy of the current one.
“Clear Current” will erase everything presently recorded to the selected playlist.
“Select From All” allows you to create a new playlist on this track by copying from any other playlist, even from a different track.
Track Name
Double-clicking allows you to change the name of the track. If a track is record armed, it is not possible to change its name.
Monitoring
The “In” and “Disk” buttons control individual track monitoring and are analogous to “Bus/Tape” monitoring selection on a tape recorder (“PEC/Direct” for you film guys). “In” monitors the physical input and “Disk” monitors the playback from what is already recorded on the track. When both buttons are selected, the sum of both is heard.
The monitoring control buttons operate in two modes. When they are outlined in colour it means they are being controlled by Mixbus according to the state of the transport:
Clicking on a button to manually set it makes it solid colour, and it will stay in that monitoring state regardless of the state of the transport:
Level Meter
The meter displays the signal level on the track, and has a peak indicator. Double clicking in this area will reset that track’s peak indicator.
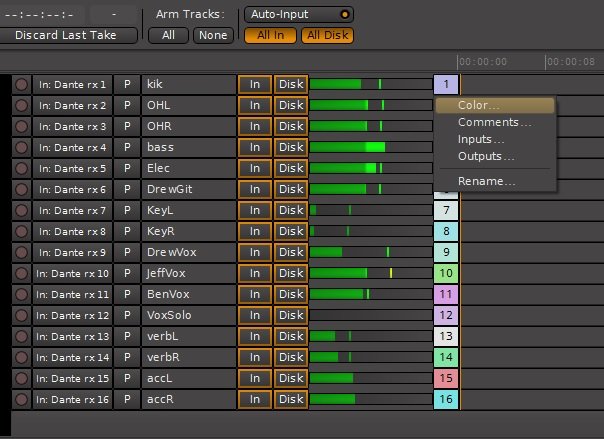
Track Number
The track numbers are displayed here. Right clicking on the track number presents a few options such as changing the colours, input and output router pages, renaming the track and adding a hidden comment.
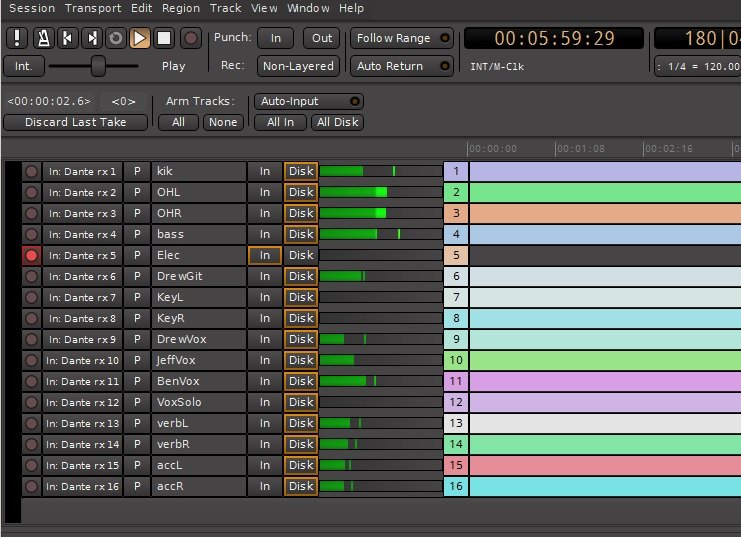
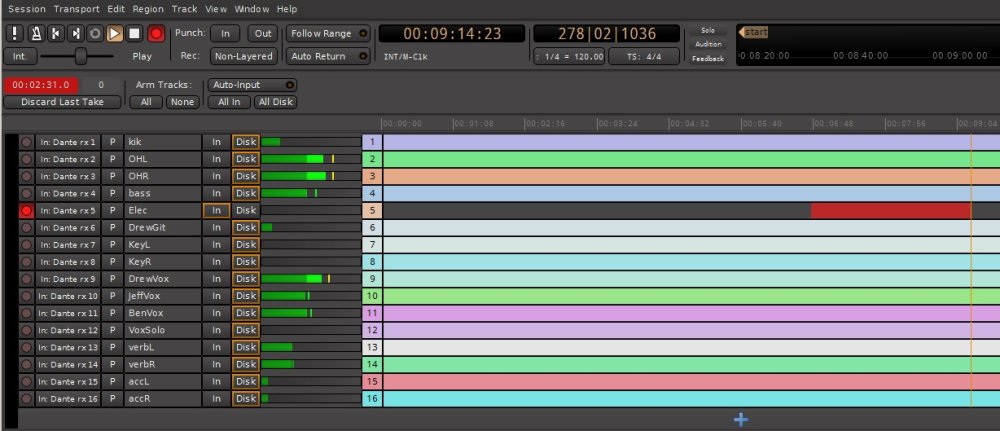
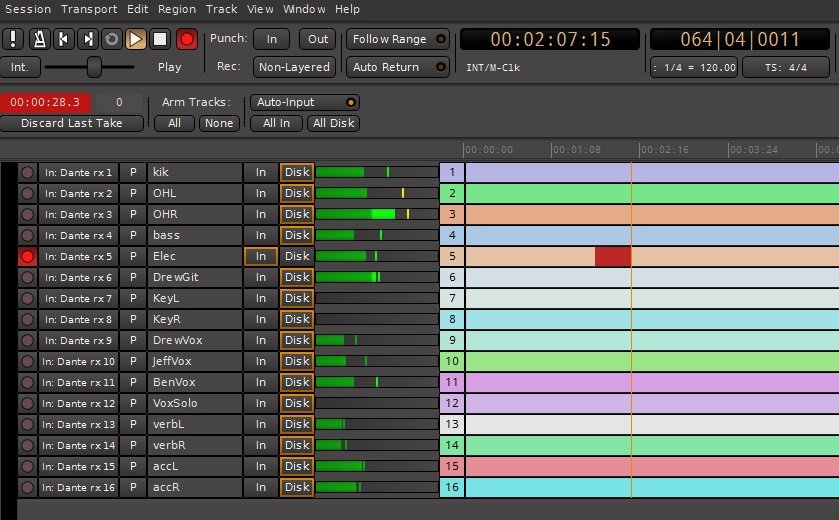
Record Timeline
The Record Timeline indicates the recorded portion of the tracks vs. time. The area always shows the full length of the recording, there is no scrolling of the timeline. When tracks are in record and the transport is rolling the track timelines are red.
When the transport is stopped the tracks change colour and indicate the time span of the recording.
If recording on a track is disabled by turning off the track arm (either while the transport is rolling or by stopping, turning off the track arms, then restarting the transport) the display will show a gap where the track has not been recorded.
Record Toolbar
On the Record page the Record Toolbar is just below the Transport toolbar:

Record Counter
This shows the elapsed recording time of the current take (NOT the total time of the recording). When in record this counter will be red in colour. If you stop the transport it will hold the time length of the last recording. If you then restart recording, the counter will be reset before continuing.
Discard Last Take
This button will remove ONLY the last recorded take. There is no history to this, once the last take has been removed, NO previous takes can be removed. Removal of the last take is destructive and cannot be undone.
X-Run counter
This counter shows the number of X-Runs that have occurred during the current take. An X-Run indicates that new audio samples have arrived prior to the previous ones being grabbed from the input buffers and saved to the recording. When this happens you may hear a click in the recording. Normally this counter should read “0”.
Global Track Arming
These are speed buttons providing one-click arm or disarm of all tracks.
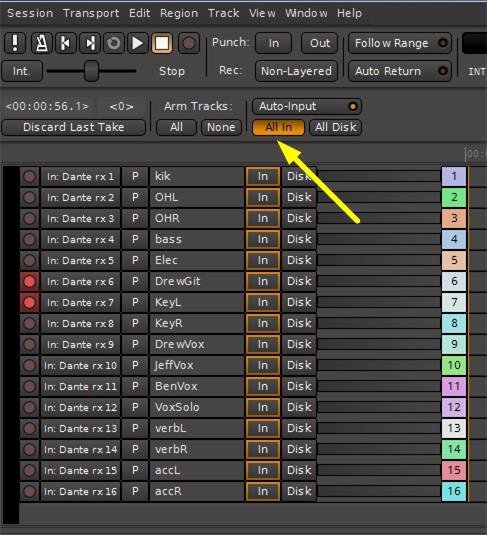
Monitoring Controls
“All In” sets monitoring of all tracks to Input. “All Disk” sets monitoring of all tracks to Disk. “Auto Input” selects the track input monitoring to follow the state of the transport.
When the “All In” or “All Disk” buttons are filled in colour, it is the same as having manually set all of the individual track monitoring buttons to that state (with colour fill). As described above, their setting in this mode is hard set and will NOT change with the state of the transport:
Auto Input
Auto Input selection is provided to facilitate monitoring when overdubbing.
Auto-Input OFF:
When playing prerecorded tracks, playback will be from disk EXCEPT for any tracks that are record-armed, these will monitor from the input:
When placed into Record (via the master record button at the top) monitoring of the recorded track will remain on Input. This may be useful when adding a new track to previously recorded tracks:
Auto-Input ON:
This mode is commonly used for overdubbing. When playing prerecorded tracks, playback will be from disk INCLUDING any tracks that are record-armed, so you can hear what was recorded before on that track:

When recording on the armed track is engaged, monitoring automatically switches to Input, so the new material for that track can be heard along with the prerecorded material:
Monitoring is a complex topic with many different modes that is explained in detail in the section Monitoring.
Available Disk Space
This indicator shows how long the current recording, at the current sample rate and number of tracks, could be if it were to completely fill your hard disk. It is not recommended to make recordings that long.
Reset Peak Hold
This button will reset the peak hold indicators on all track meters at once. Remember that individual track peak holds can be reset by double-clicking in the meter area of that track.
Basic Recording
Recording involves the following steps:
- arm the individual tracks to be recorded
- set track monitoring as desired
- click on the master record button in the transport toolbar. The record button will flash until the transport is started.
- press the Play button to start recording,
Basic Overdubbing
Overdubbing involves the following steps:
- arm the individual tracks to be recorded
- typically, set track monitoring to “Auto-Input” and “Disk”
- set the transport in Play
- listen to the playback up until the point where recording the new material is to begin
- click the master record button at the top to start recording at the desired point. If “Auto-Input” is selected monitoring of the armed tracks will automatically switch to “Input” so you can hear the new material along with the prerecorded material.
Post your comment on this topic.